Create a Form for Uploading a Tuple Django
In this four-role tutorial serial, you're building a social network with Django that yous can showcase in your portfolio. This project is strengthening your understanding of relationships between Django models and showing you how to use forms so that users can interact with your app and with each other. You're as well making your site expect proficient by using the Bulma CSS framework.
In the previous part of this serial, y'all added functionality and then that users can create dweets on the back end and display them on the front end. At this point, your users can observe and follow other users and read the content of the profiles they follow. They can click a button that sends an HTTP POST asking handled by Django to unfollow a contour if they want to cease reading their content.
In the quaternary part of this tutorial series, you'll learn how to:
- Create and render Django forms from your
Dweetmodel - Prevent double submissions and display helpful error messages
- Interlink pages of your app using dynamic URLs
- Refactor a view function
- Use
QuerySetfield lookups to filter your information on the back terminate
Once yous finish going through this last function of the tutorial, yous'll have a fully functional bones social network built with Django. It'll allow your users to create short text-based messages, discover and follow other users, and read the content of the profiles they follow. They'll likewise exist able to unfollow a contour if they want to terminate reading their content.
Additionally, you'll accept showcased that you can apply a CSS framework to make your web app wait great without too much extra effort.
Y'all can download the code that yous'll demand to start the final role of this project past clicking the link beneath and going to the source_code_start/ folder:
Demo
In this 4-part serial, you're building a small social network that allows users to post curt text-based messages. The users of your app can too follow other user profiles to meet the posts of these users or unfollow them to end seeing their text-based posts:
You lot're also learning how to use the CSS framework Bulma to give your app a convenient appearance and make information technology a portfolio projection y'all can be proud to show off.
In the fourth and final part of this tutorial serial, you lot'll learn how to build Django forms on acme of an existing model. You'll too ready and handle more HTTP Postal service asking submissions so that your users can post their text-based messages.
At the cease of this tutorial, you'll have completed your basic social network built with Django. By then, your users will be able to navigate to a profile listing and to private profile pages, follow and unfollow other users, and come across the dweets of the profiles they follow displayed on their dashboard. They'll also be able to submit dweets through a class on their dashboard.
Project Overview
In this section, y'all'll get an overview of what topics you lot'll cover in this final part of the tutorial series. You'll also get a run a risk to revisit the full project implementation steps, in case you need to skip dorsum to a previous step that you completed in an before role of the series.
At this indicate, you should have finished working through parts 1, two, and three of this tutorial serial. Congratulations! Yous've made your manner to the final office, which focuses on building forms and treatment form submissions:
Once you've implemented the steps of this last function of the serial, y'all've completed the basic version of your Django social network. You lot'll be ready to take any adjacent steps past yourself to make this project stand out in your web programmer portfolio.
To get a high-level idea of how the final part in this series on building your Django social network fits into the context of the whole project, you tin expand the collapsible section below:
You're implementing the project in a number of steps spread out over multiple split up tutorials in this series. At that place's a lot to embrace, and you're going into details forth the way:
✅ Part 1: Models and Relationships
- Step 1: Ready the Base Project
- Step 2: Extend the Django User Model
- Pace 3: Implement a Mail service-Save Claw
✅ Part 2: Templates and Forepart-Stop Styling
- Footstep 4: Create a Base Template With Bulma
- Stride 5: List All User Profiles
- Stride vi: Access Individual Profile Pages
✅ Part three: Follows and Dweets
- Step 7: Follow and Unfollow Other Profiles
- Step 8: Create the Back-End Logic For Dweets
- Step 9: Display Dweets on the Front End
📍 Part 4: Forms and Submissions
- Step 10: Submit Dweets Through a Django Class
- Step 11: Prevent Double Submissions and Handle Errors
- Step 12: Improve the Front-End User Experience
Each of these steps volition provide links to whatsoever necessary resources. By approaching the steps ane at a time, you'll accept the opportunity to intermission and come back at a later indicate in case yous want to take a break.
With the high-level structure of this tutorial series in mind, you've got a good idea of where you're at and which implementation steps you might take to catch up on, if you haven't completed them yet.
Before getting started with the next step, take a quick look at the prerequistes to skim any links to other resources that might be helpful along the style.
Prerequisites
To successfully piece of work through this concluding part of your projection, you demand to have completed the commencement part on models and relationships, the second part on templates and styling, and the 3rd part on follows and dweets. Please confirm that your project works equally described in that location. Y'all should also be comfortable with the following concepts:
- Using object-oriented programming in Python
- Setting up a bones Django project
- Managing routing and redirects, view functions, templates, models, and migrations in Django
- Using and customizing the Django Admin interface
Make certain that you've completed the offset three parts of this series. This concluding part will choice up correct where you left off at the end of the third office.
You tin can also download the code that you'll need for starting the final part of your project by clicking the link below and going to the source_code_start/ folder:
For additional requirements and farther links, check out the prerequisites mentioned in the outset part of this tutorial series on building a bones social network in Django.
Footstep x: Submit Dweets Using Django Forms
For the sake of this tutorial serial, you decided early on to handle user creation in your Django admin. Your tiny social network is invite-only, and y'all're the i who decides to create user accounts.
However, once your users get into your social network app, yous'll desire to give them the opportunity to create content. They won't take access to the Django admin interface, and your Dwitter will be barren without any chance for users to create content. You'll demand another form as an interface for your users to submit dweets.
Create a Text Input Form
If you lot're familiar with HTML forms, so you might know that you could handle the text submissions by creating another HTML <form> chemical element with specific <input> elements. Information technology would, however, have to wait a bit unlike from the form that you lot built for your buttons.
In this tutorial, you'll learn how to create HTML forms using a Django class. Y'all'll write a Django course, and Django will convert it to an HTML <form> element when rendering the folio.
To start with this office of the tutorial, create a new file in your Django dwitter app, and call it forms.py. This file tin hold all the forms y'all might demand for your projection. You'll only need a single form so that your users tin can submit their dweets:
1 # dwitter/forms.py two 3 from django import forms iv from .models import Dweet 5 half dozen class DweetForm ( forms . ModelForm ): 7 body = forms . CharField ( required = True ) eight 9 class Meta : 10 model = Dweet xi exclude = ( "user" , ) In this code snippet, you lot create DweetForm and inherit from Django'due south ModelForm. Creating forms in this fashion relies heavily on abstractions set up by Django, which means that in this tutorial, y'all need to ascertain very little by yourself to get a working class:
-
Lines 3 to 4: You import Django'southward built-in
formsmodule and theDweetmodel that you created in a previous part of this tutorial series. -
Line 6: Yous create a new class,
DweetForm, that inherits fromforms.ModelForm. -
Line 7: You laissez passer the field that you want the class to render, and you ascertain its type. In this case, you want a graphic symbol field to permit for text input.
torsois the just field, and you make information technology a required field and so that there won't be any empty dweets. -
Line 9: You lot create a
Metaoptions form inDweetForm. This options class allows you to pass any information that isn't a field to your course course. -
Line 10: You lot need to ascertain which model
ModelFormshould take its information from. Because you lot want to make a form that allows users to create dweets,Dweetis the right pick here. -
Line 11: By adding the name of the model field that yous want to exclude to the
excludetuple, you ensure that Django will omit it when creating the form. Call up to add a comma (,) after"user"so that Python creates a tuple for you lot!
Y'all want to make the dweet submissions equally user-friendly equally possible. Users can only dweet on your social network when they're logged in, and they can merely create dweets for themselves. Therefore, y'all don't need to explicitly pass which user is sending a dweet within the grade.
The setup described in this tutorial holds all the information Django needs to create HTML forms that take hold of all the info you need on the front terminate. Time to take a look from that end.
Render the Form in Your Template
Subsequently creating DweetForm in forms.py, yous can import it in your lawmaking logic and send the information to your dashboard template:
# dwitter/views.py from django.shortcuts import render from .forms import DweetForm from .models import Contour def dashboard ( request ): class = DweetForm () return render ( asking , "dwitter/dashboard.html" , { "form" : form }) With these changes to views.py, you lot get-go imported DweetForm from forms.py. Then you created a new DweetForm instance, assigned it to form, and passed it to your dashboard template in your context dictionary under the key "form". This setup allows you to access and render your form in your template:
<!-- dwitter/templates/dwitter/dashboard.html --> {% extends 'base.html' %} {% block content %} < div class = "cavalcade" > {% for followed in user.profile.follows.all %} {% for dweet in followed.user.dweets.all %} < div class = "box" > {{ dweet.body }} < span course = "is-small has-text-grey-light" > ({{ dweet.created_at }} past {{ dweet.user.username }} </ span > </ div > {% endfor %} {% endfor %} </ div > < div grade = "column is-one-third" > {{ grade.as_p }} </ div > {% endblock content %} The HTML course that you're assigning to the <div> element uses Bulma'southward CSS rules to create a new column on your dashboard page. This extra cavalcade makes the page feel less crowded and separates the feed content from the course. You so render the Django course with {{ form.as_p }}. Indeed, an input box shows up:
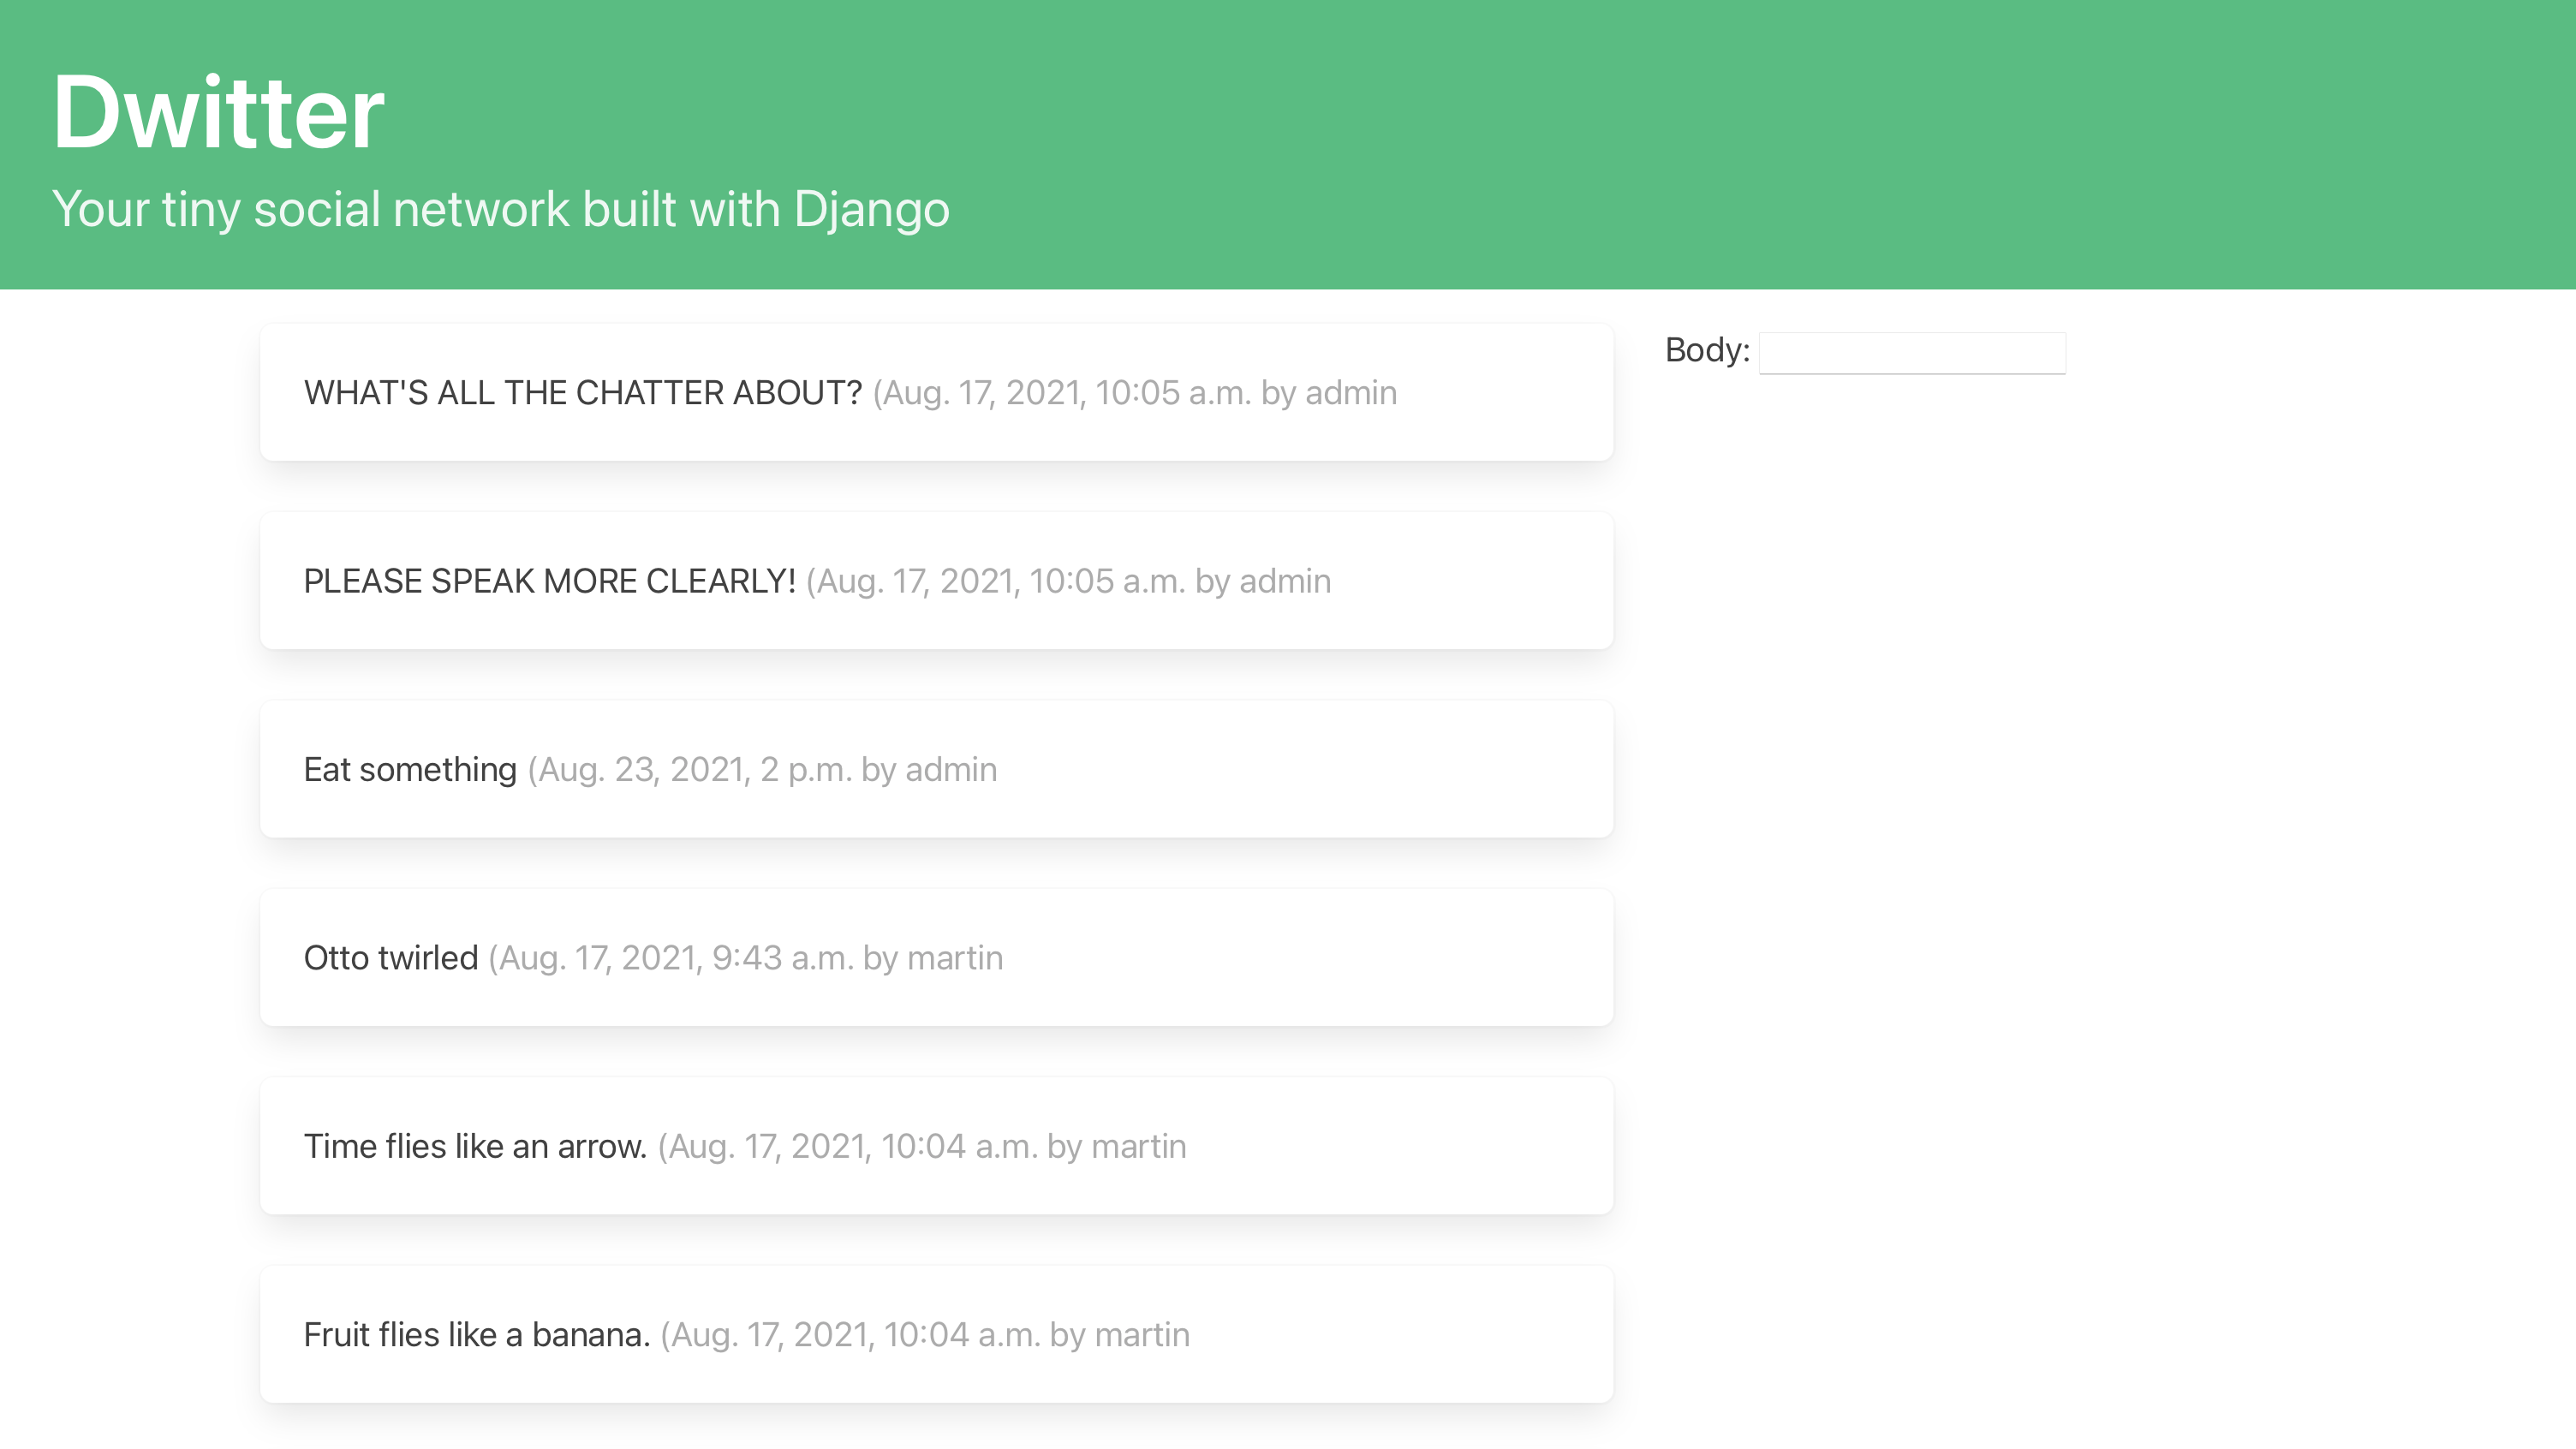
This setup shows a minimal display of your Django class. It only has one field, just like yous defined in DweetForm. However, it doesn't await proficient, the text field seems far too small, and there's a label reading Body next to the input field. You didn't enquire for that!
Yous can ameliorate the display of your Django form by adding customizations through a widget to forms.CharField in forms.py:
1 # dwitter/forms.py ii iii from django import forms 4 from .models import Dweet 5 vi course DweetForm ( forms . ModelForm ): 7 torso = forms . CharField ( viii required = True , 9 widget = forms . widgets . Textarea ( 10 attrs = { 11 "placeholder" : "Dweet something..." , 12 "class" : "textarea is-success is-medium" , xiii } 14 ), 15 label = "" , 16 ) 17 18 form Meta : 19 model = Dweet twenty exclude = ( "user" , ) By adding a Django widget to CharField, you go to command a couple of aspects of how the HTML input element will get represented:
-
Line 9: In this line, you choose the type of input chemical element that Django should use and set it to
Textarea. TheTextareawidget will render equally an HTML<textarea>element, which offers more space for your users to enter their dweets. -
Lines 10 to thirteen: Y'all further customize
Textareawith settings defined inattrs. These settings render to HTML attributes on your<textarea>element. -
Line 11: You lot add placeholder text that volition show upwards in the input box and get away once the user clicks on the form field to enter their dweet.
-
Line 12: You add the HTML class
"textarea", which relates to a textarea CSS style rule defined by Bulma and will make your input box more attractive and ameliorate matched to the rest of your folio. You besides add together two boosted classes,is-successandis-medium, that outline the input field in light-green and increase the text size, respectively. -
Line 15: Y'all prepare
labelto an empty string (""), which removes the Body text that previously showed upwards due to a Django default setting that renders the name of a grade field as its label.
With only a few customizations in Textarea, y'all made your input box fit much better into the existing style of your page:
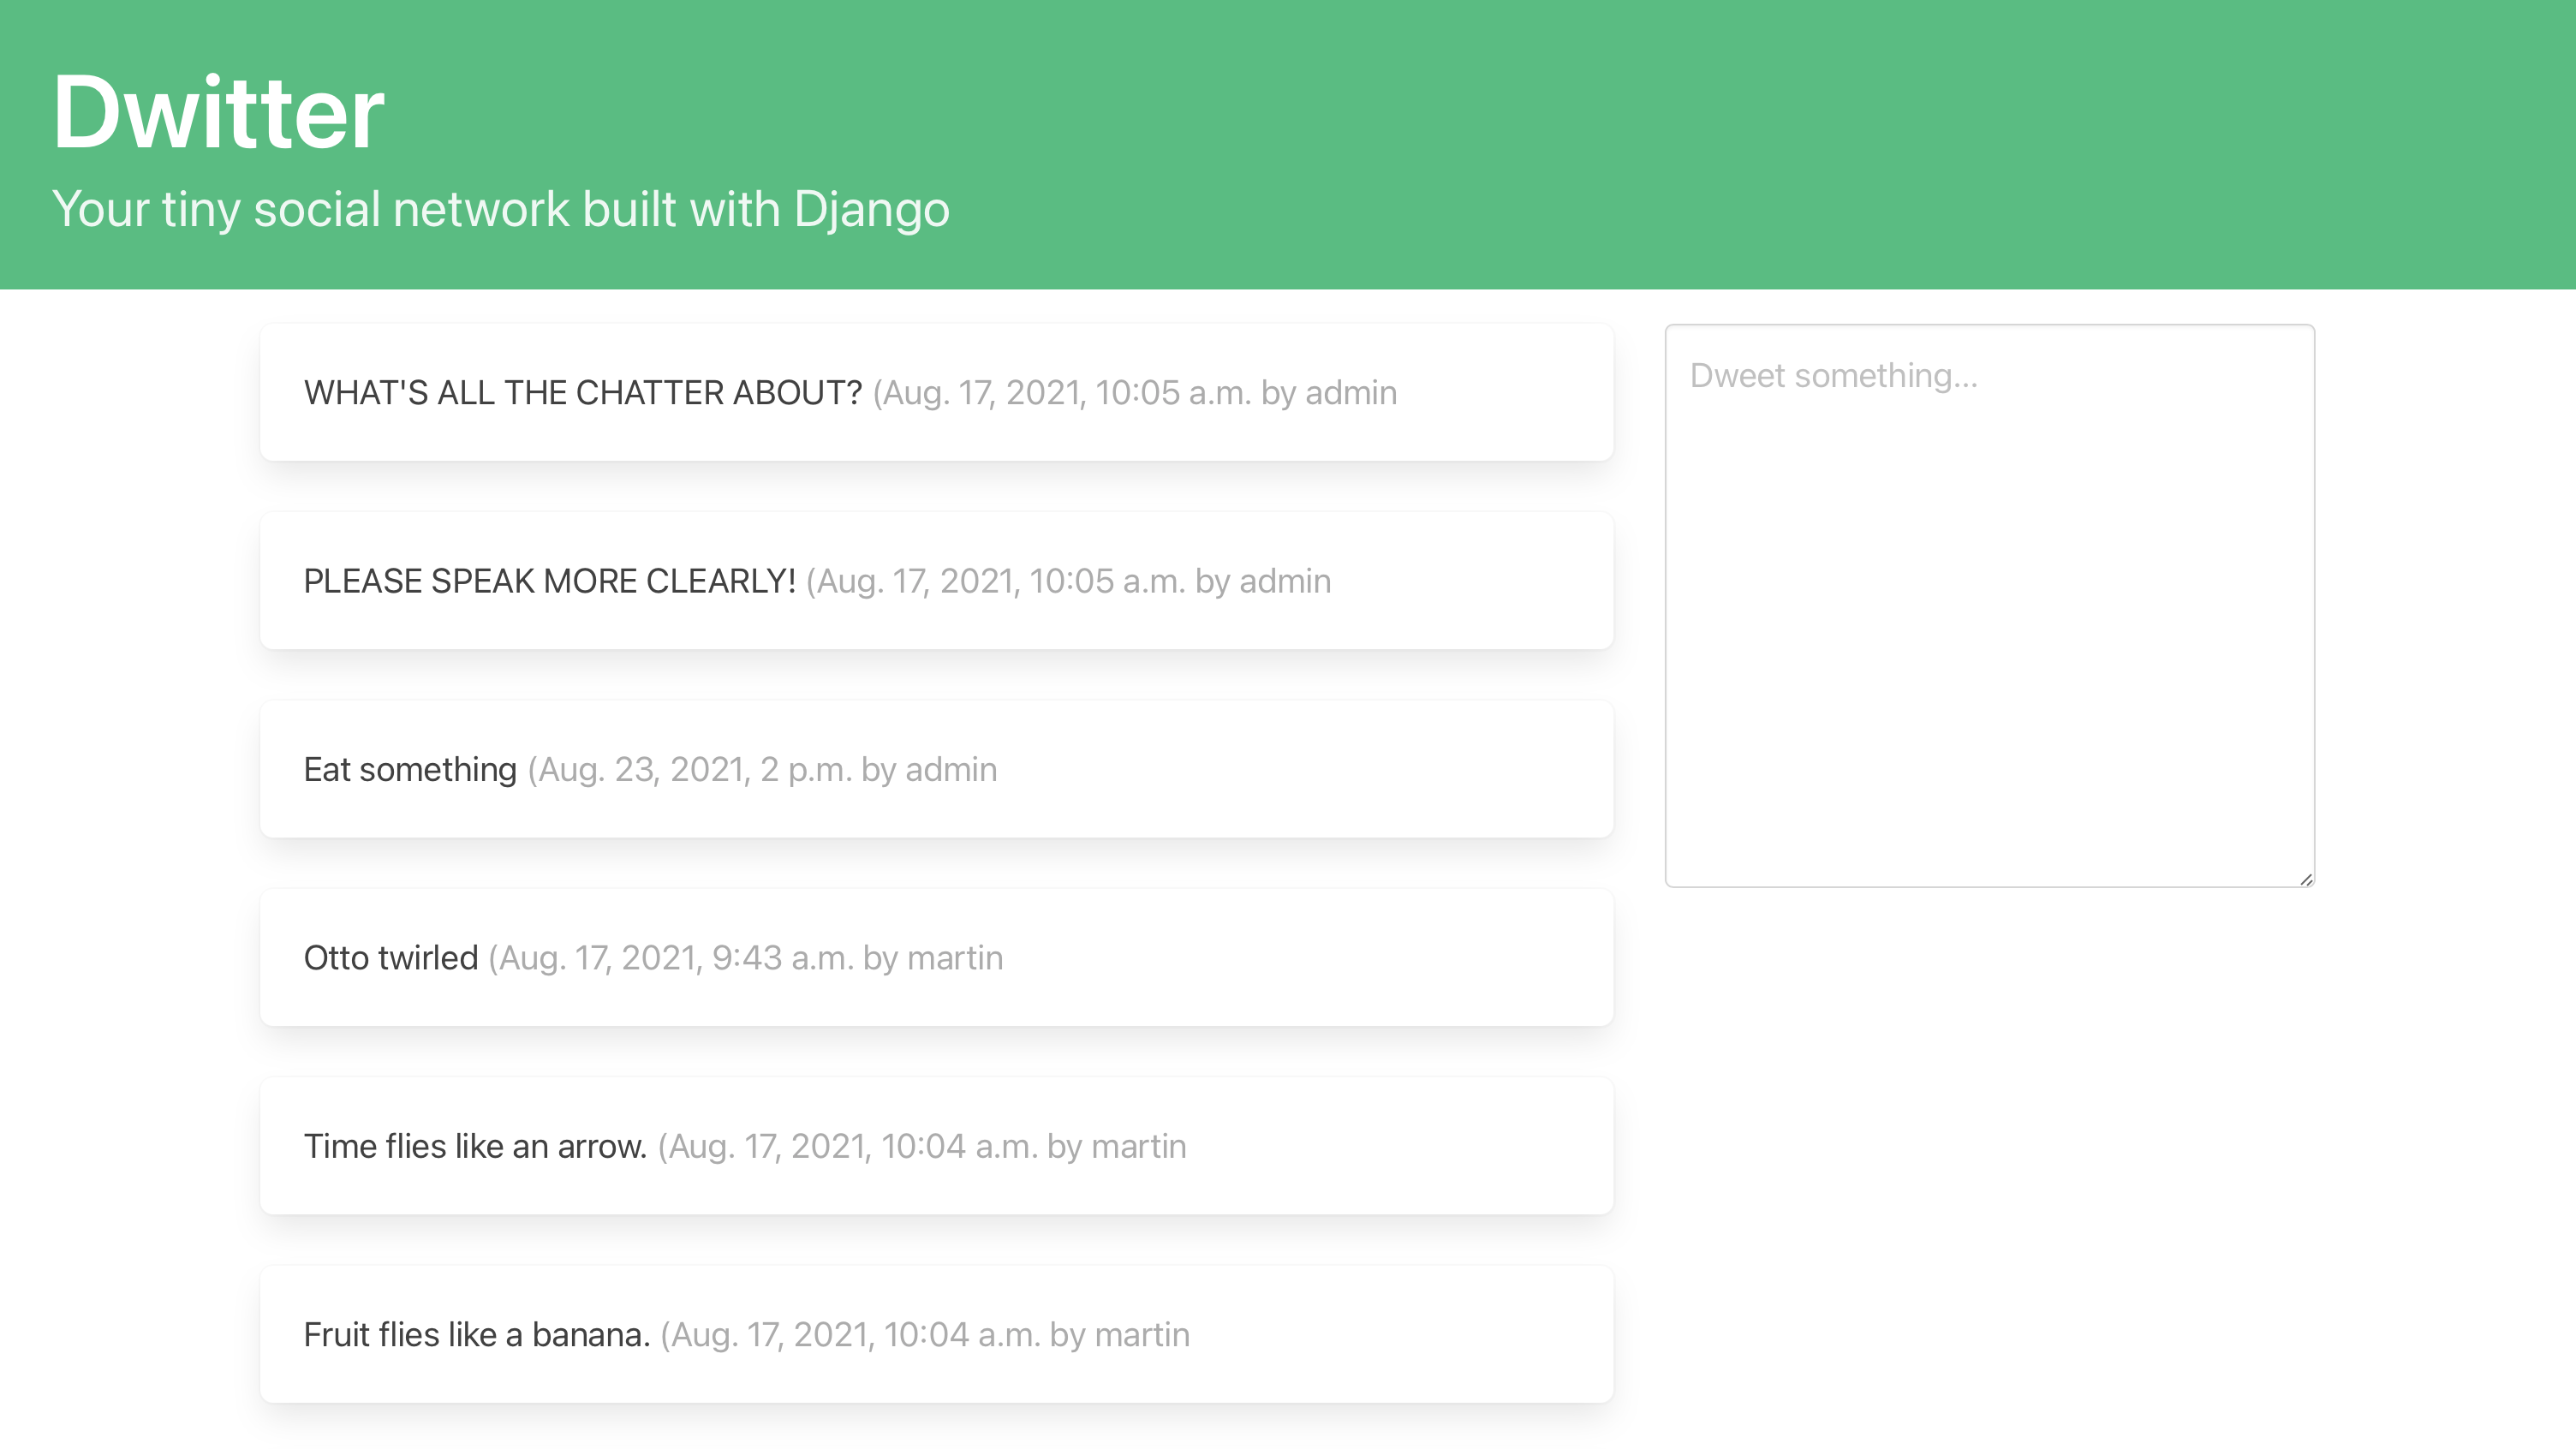
The input box looks good, but information technology's non a functional form yet. Did anyone ask for a Submit button?
Make Form Submissions Possible
Django forms can take the hassle out of creating and styling your form fields. Nonetheless, yous still need to wrap your Django form into an HTML <form> element and add a button. To create a functional form that allows POST requests, you'll also need to define the HTTP method accordingly:
i <!-- dwitter/templates/dwitter/dashboard.html --> 2 3 {% extends 'base.html' %} iv 5 {% block content %} six vii < div grade = "cavalcade" > 8 {% for followed in user.contour.follows.all %} ix {% for dweet in followed.user.dweets.all %} 10 < div course = "box" > 11 {{ dweet.trunk }} 12 < span form = "is-small-scale has-text-grey-lite" > 13 ({{ dweet.created_at }} past {{ dweet.user.username }} 14 </ span > 15 </ div > 16 {% endfor %} 17 {% endfor %} 18 </ div > 19 twenty < div class = "column is-one-third" > 21 < class method = "postal service" > 22 {% csrf_token %} 23 {{ course.as_p }} 24 < button class = "push button is-success is-fullwidth is-medium mt-5" 25 type = "submit" >Dweet 26 </ button > 27 </ form > 28 </ div > 29 30 {% endblock content %} With another incremental update to your HTML code, you completed the front-cease setup of your dweet submission form:
- Lines 21 and 27: You wrapped the course code into an HTML
<form>element withmethodset to"post"because you want to send the user-submitted messages via a Post request. - Line 22: You added a CSRF token using the aforementioned template tag you used when creating the form for following and unfollowing profiles.
- Lines 24 to 26: You lot completed the form by adding a button with some Bulma styling through the
classaspect, which allows your users to submit the text they entered.
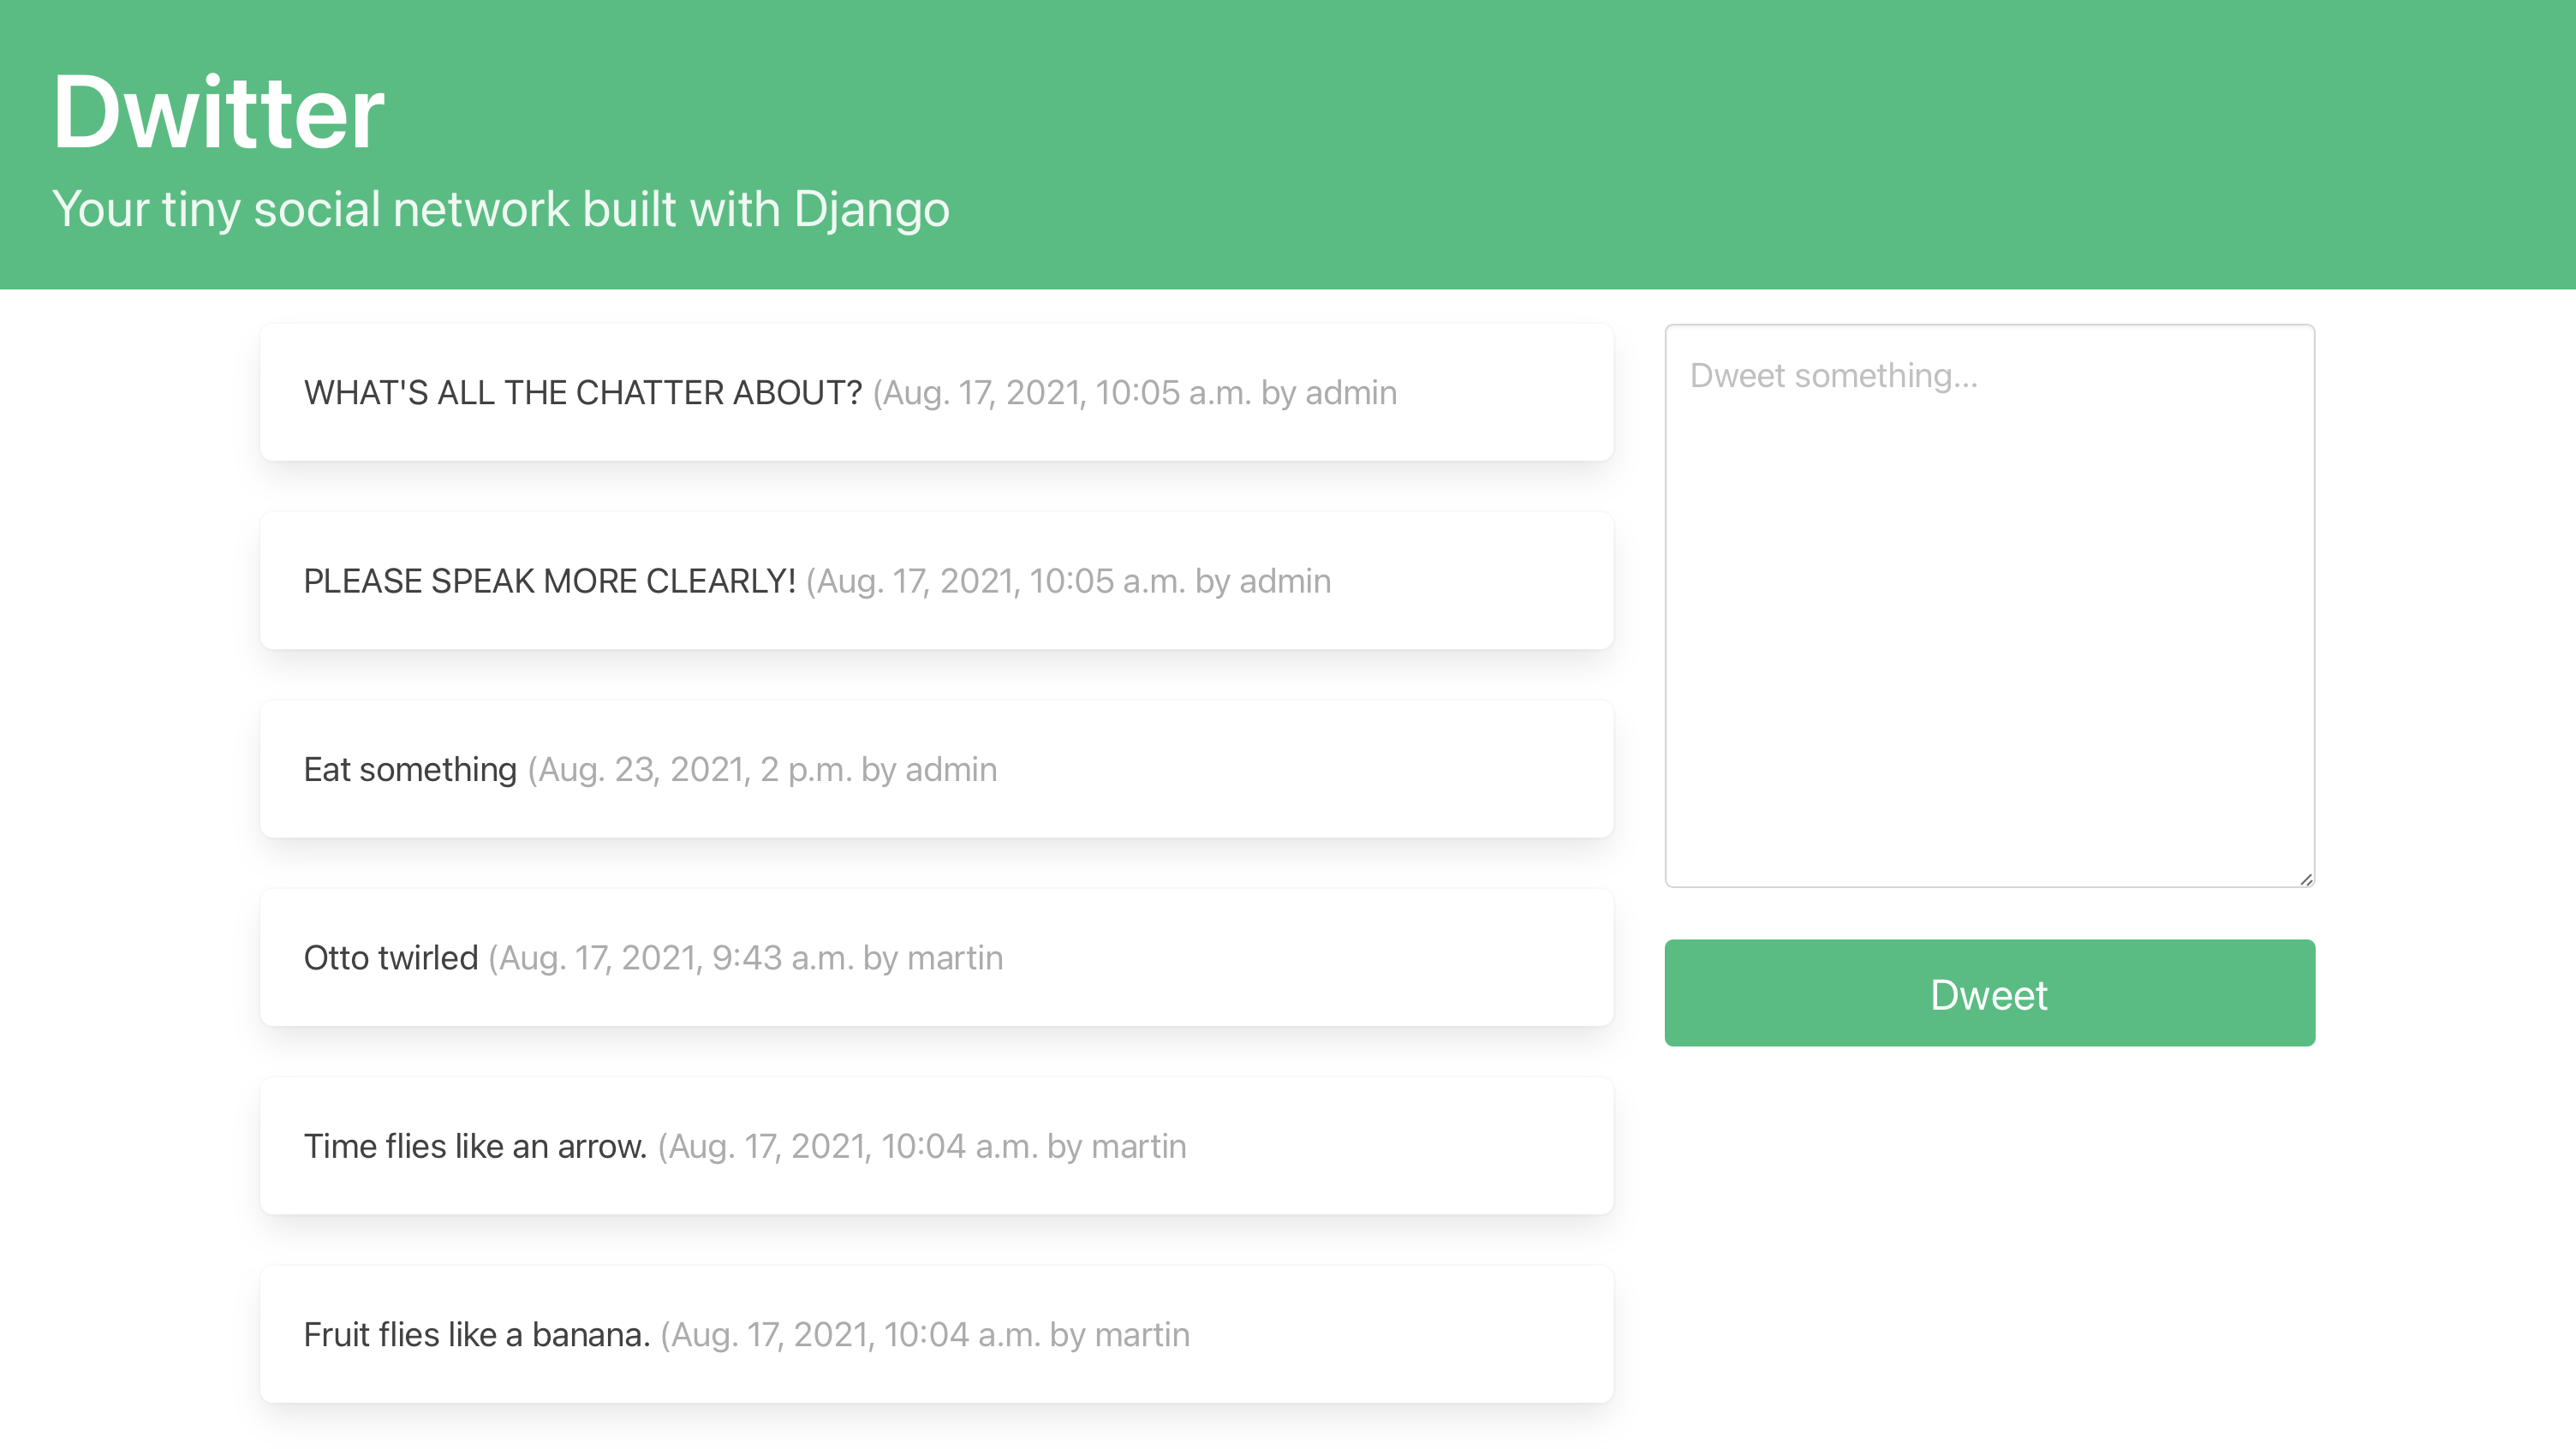
The class looks nice and seems to be ready to receive your input:
What happens when you click the Dweet button? Not much, because you haven't set whatsoever lawmaking logic to complement your front-end code all the same. Your next stride is to implement the submit functionality in views.py:
1 # dwitter/views.py ii 3 def dashboard ( asking ): 4 if request . method == "Mail" : 5 form = DweetForm ( request . POST ) 6 if class . is_valid (): 7 dweet = form . save ( commit = Faux ) 8 dweet . user = request . user 9 dweet . save () 10 form = DweetForm () 11 return render ( request , "dwitter/dashboard.html" , { "form" : course }) With some additions to dashboard(), you make it possible for your view to handle the submitted data and create new dweets in your database:
-
Line iv: If a user submits the form with an HTTP POST request, then yous desire to handle that course information. If the view function was called due to an HTTP GET request, you'll bound right over this whole code cake into line ten and render the folio with an empty course in line 11.
-
Line five: You make full
DweetFormwith the data that came in through the POST request. Based on your setup informs.py, Django will pass the data totorso.created_atwill be filled automatically, and y'all explicitly excludeduser, which will therefore stay empty for at present. -
Line 6: Django course objects have a method called
.is_valid(), which compares the submitted information to the expected data defined in the form and the associated model restrictions. If all is well, the method returnsTrue. You only permit your code to continue if the submitted form is valid. -
Line vii: If your form already included all the data it needs to create a new database entry, then you could employ
.relieve()without any arguments. However, you're notwithstanding missing the requireduserentry to acquaintance the dweet with. By addingcommit=False, you prevent committing the entry to the database nevertheless. -
Line 8: You pick the currently logged-in user object from Django's
requestobject and save it todweet, which you created in the previous line. In this way, you've added the missing information by building the association with the electric current user. -
Line 9: Finally, your
dweethas all the information it needs, so you can successfully create a new entry in the associated table. Y'all tin at present write the data to your database with.relieve(). -
Line 10 to xi: Whether or not you've handled a Mail submission, y'all e'er pass a new empty
DweetForminstance torender(). This role call re-displays the folio with a new blank grade that'south ready for more of your thoughts.
With that, you lot've successfully created the text input form and hooked information technology up to your code logic, so the submissions will be handled correctly. In this part of the tutorial series, you besides got to know Django forms. Yous rendered a form in your template, then practical Bulma styling to it by customizing attributes in a Textarea widget.
Before you're ready to open up your Django social network to real-life users, at that place is, however, i outcome you demand to address. If y'all write a dweet and submit it at present, it gets added all right, simply if you lot reload the folio later submitting, the same dweet will get added once more!
Step 11: Prevent Double Submissions and Handle Errors
At this point, you can create new dweets through your app's forepart end and view your ain dweets together with the dweets of the profiles you follow on your dashboard. At the end of this step, yous'll take prevented double dweet submissions and learned how Django displays errors with the text input.
But offset, you should get an idea of what the problem is. Go to your dashboard, write an inspiring dweet, and click on Dweet to submit information technology. You'll see it evidence up in your listing of displayed dweets in your timeline, and the dweet course volition prove up every bit empty again.
Without doing anything else, reload the page with a keyboard shortcut:
- Cmd + R on macOS
- Ctrl + R on Windows and Linux
Your browser might prompt you with a popular-up that asks whether you want to transport the course over again. If this bulletin shows upward, confirm past pressing Send. At present you'll find that the same dweet yous sent earlier appears a second time on your dashboard. Yous tin go along doing this equally many times as you desire to:
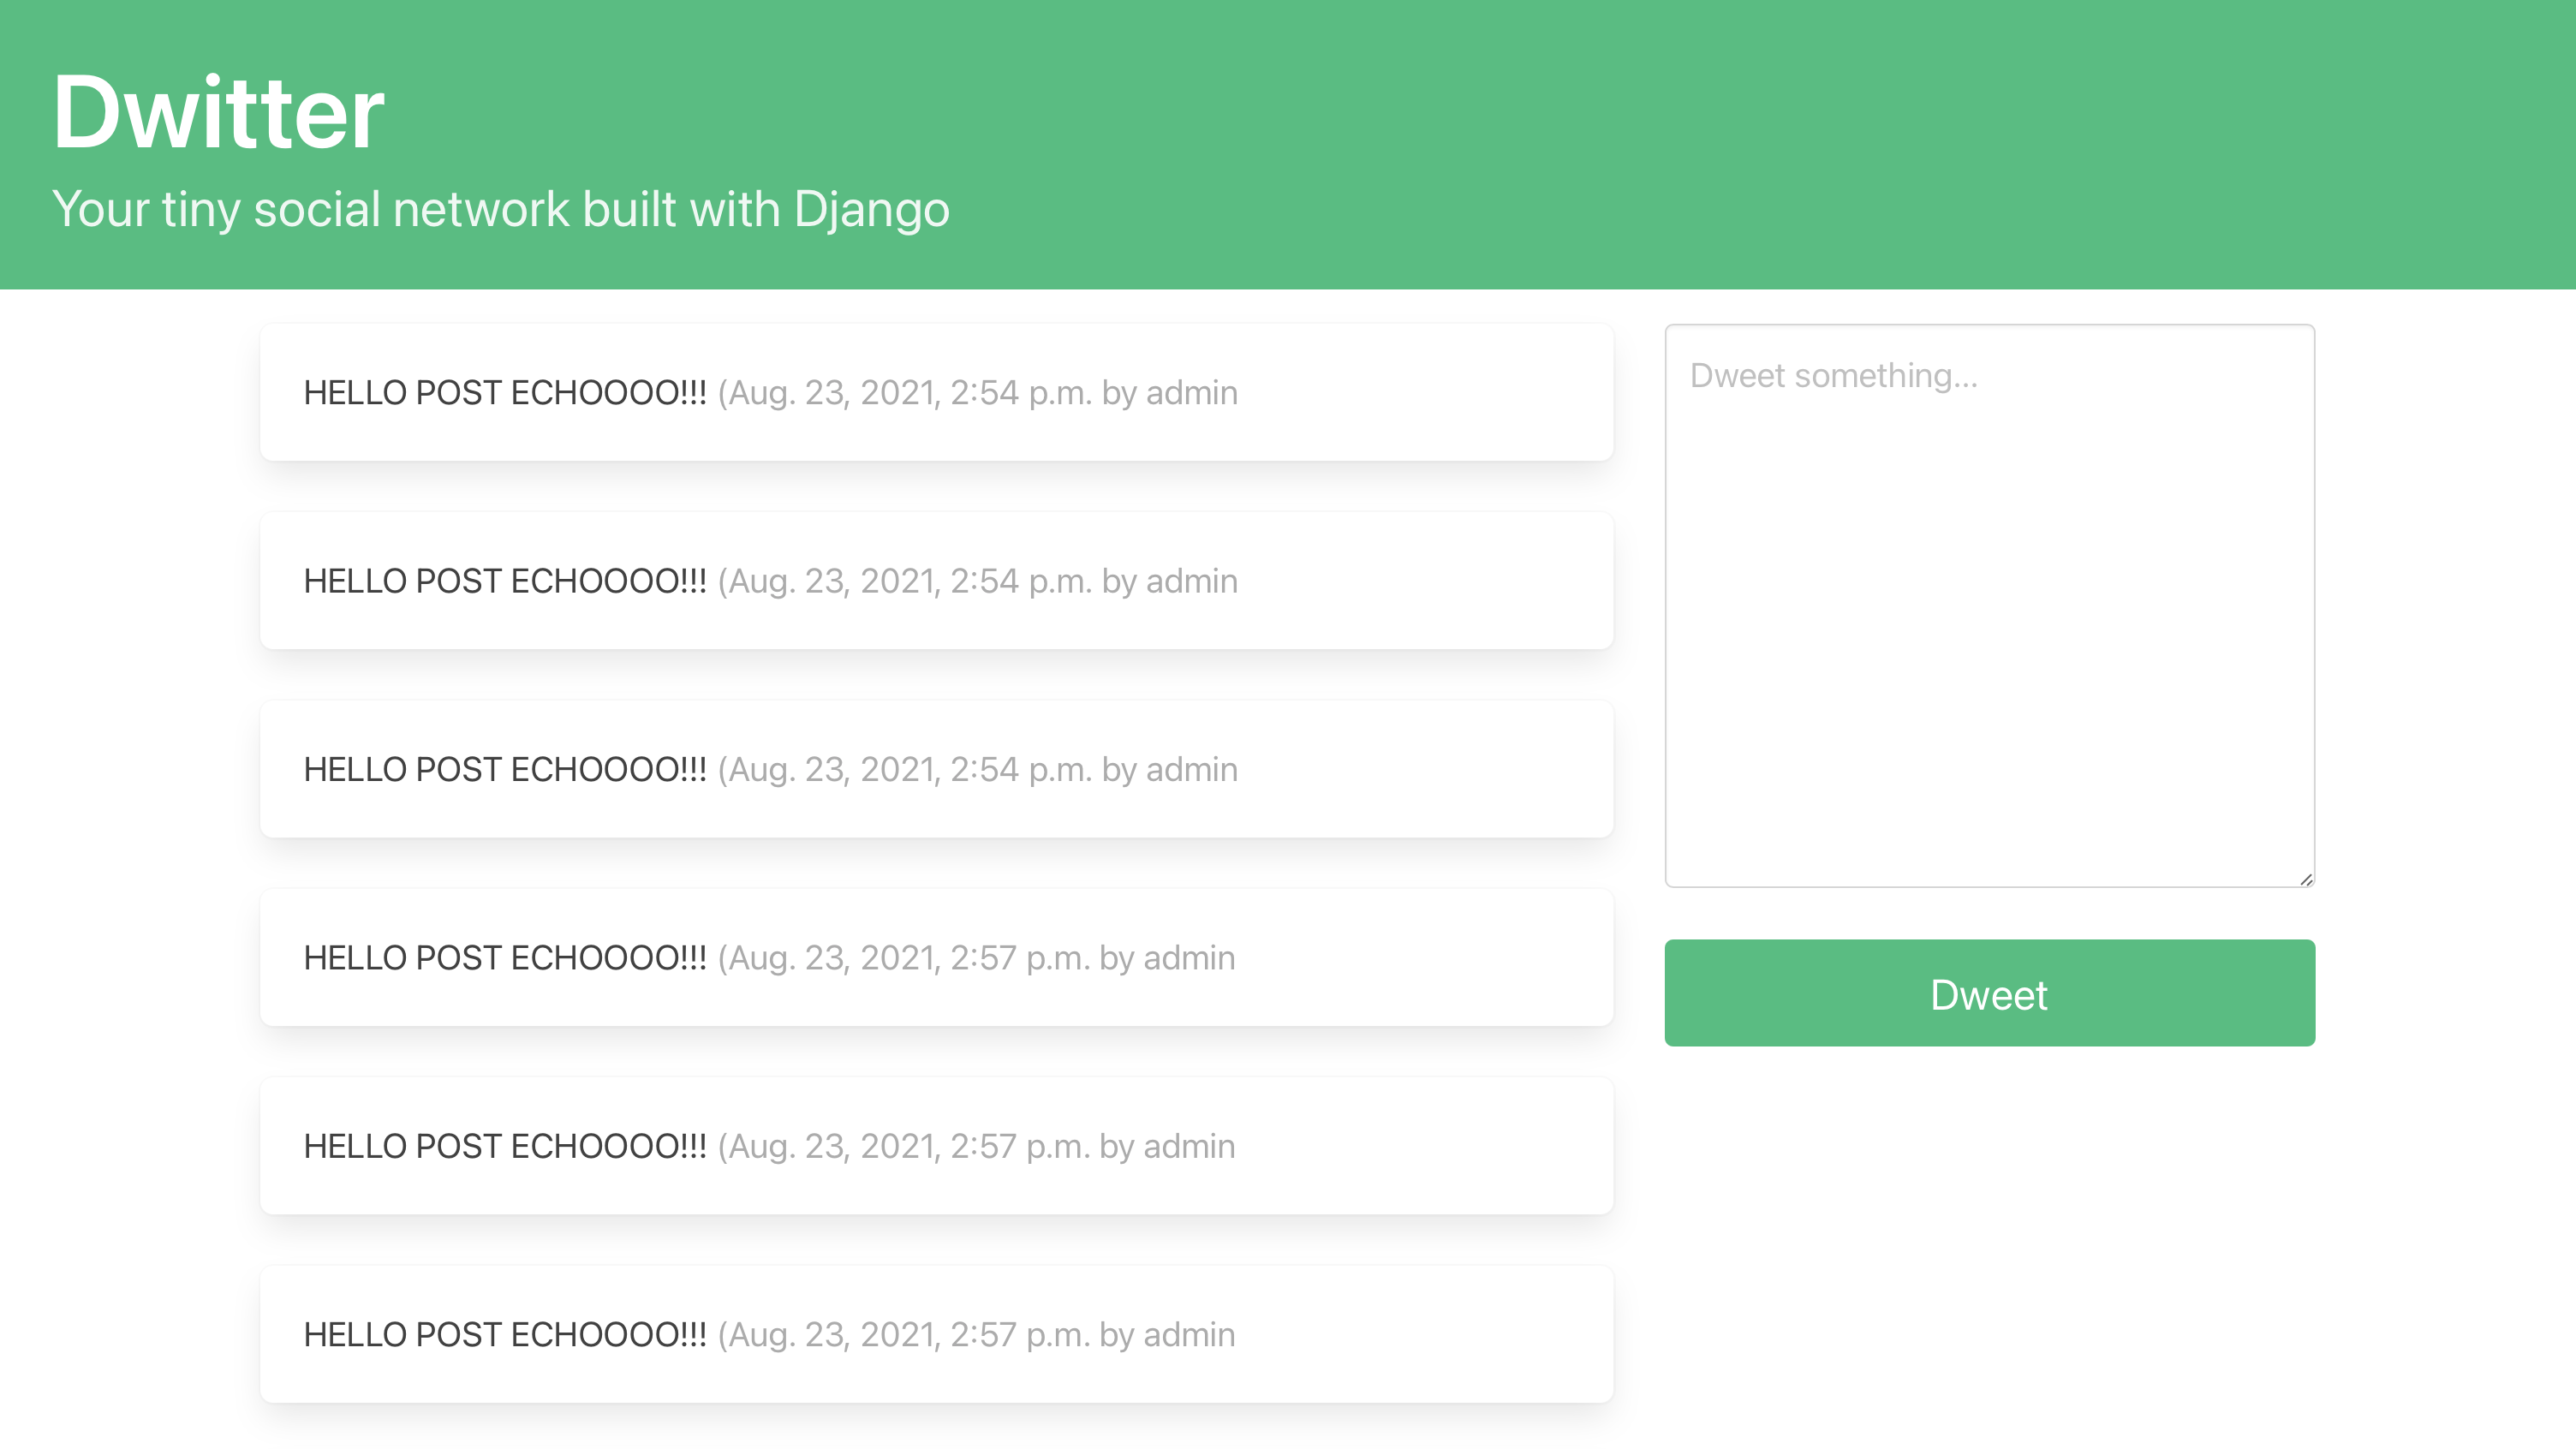
After posting a dweet, Django sends some other POST request with the same data and creates another entry in your database if you reload the page. You'll meet the dweet pop up a second fourth dimension. And a third fourth dimension. And a fourth fourth dimension. Django will keep making duplicate dweets equally often as yous go on reloading. You don't want that!
Forbid Double Submissions
To avoid double dweet submission, yous'll take to forestall your app from keeping the request data around, so that a reload won't have the take a chance to resubmit the data. You can do just that by using a Django redirect:
# dwitter/views.py from django.shortcuts import render , redirect # ... def dashboard ( asking ): if request . method == "POST" : class = DweetForm ( asking . POST ) if form . is_valid (): dweet = form . save ( commit = False ) dweet . user = request . user dweet . save () return redirect ( "dwitter:dashboard" ) form = DweetForm () return return ( request , "dwitter/dashboard.html" , { "course" : form }) By importing redirect() and returning a call to information technology after successfully calculation a newly submitted dweet to your database, you lot ship the user back to the aforementioned page. However, this time you're sending a Go request when redirecting, which means that whatever number of page reloads volition only ever show the dweets that already be instead of creating an regular army of cloned dweets.
You set this up by referencing the app_name variable and the name keyword argument of a path(), which y'all defined in your URL configuration:
-
"dwitter"is theapp_namevariable that describes the namespace of your app. You lot tin find it earlier the colon (:) in the cord argument passed toredirect(). -
"dashboard"is the value of thenamekeyword argument for thepath()entry that points todashboard(). You need to add it subsequently the colon (:) in the string argument passed toredirect().
To use redirect() as shown above, you need to fix the namespacing in dwitter/urls.py accordingly, which you did in a previous role of the tutorial serial:
# dwitter/urls.py # ... app_name = "dwitter" urlpatterns = [ path ( "" , dashboard , proper name = "dashboard" ), # ... With urls.py prepare as shown above, you can use redirect() to bespeak your users back to their dashboard folio with a Become request later successfully processing the Mail service request from their form submission.
After you lot return redirect() at the end of your conditional statement, whatsoever reloads simply load the page without resubmitting the grade. Your users tin can now safely submit brusk dweets without unexpected results. Nonetheless, what happens when a dweet goes across the 140 graphic symbol limit?
Attempt typing a long dweet that goes over the 140 character limit and submit it. What happens? Nothing! But there'due south also no error message, so your users might not even know that they did something wrong.
Additionally, the text y'all entered is gone, a major badgerer in poorly designed user forms. Then y'all might want to brand this feel better for your users past notifying them virtually what they did wrong and keeping the text they entered!
Handle Submission Errors
Y'all divers in your models that your text-based messages can have a maximum length of 140 characters, and you're enforcing this when users submit their text. Nonetheless, you're not telling them when they exceed the character limit. When they submit a dweet that's too long, their input is lost.
The good news is that you lot can utilize Django forms rendered with {{ grade.as_p }} to display fault letters that get sent along with the course object without needing to add whatsoever code. These error letters tin can improve the user experience significantly.
But currently, you can't see any error letters, so why is that? Have another look at dashboard():
1 # dwitter/views.py 2 three # ... 4 five def dashboard ( request ): 6 if request . method == "Postal service" : 7 grade = DweetForm ( request . POST ) 8 if form . is_valid (): 9 dweet = form . save ( commit = Imitation ) 10 dweet . user = asking . user xi dweet . salve () 12 render redirect ( "dwitter:dashboard" ) 13 form = DweetForm () 14 render return ( request , "dwitter/dashboard.html" , { "form" : grade }) In the highlighted lines, you can see that you're creating 1 of ii unlike DweetForm objects, either a leap or an unbound form:
- Line vii: If your role gets chosen from a Mail request, yous instantiate
DweetFormwith the data that came along with the request. Django creates a jump grade that has access to data and can go validated. - Line 13: If your page gets called with a Get request, yous're instantiating an unbound form that doesn't accept any data associated with information technology.
This setup worked fine and made sense upward to now. You desire to display an empty course if a user accesses the page past navigating there, and you want to validate and handle the submitted data in your form if a user writes a dweet and sends it to the database.
However, the crux is in the details here. You can—and should—validate the leap course, which you practise in line 8. If the validation passes, the dweet gets written to your database. However, if a user adds besides many characters, then your class validation fails, and the code in your conditional argument doesn't become executed.
Python jumps execution to line xiii, where you lot overwrite form with an empty unbound DweetForm object. This form is what gets sent to your template and rendered. Since y'all overwrote the bound form that held the information about the validation mistake with an unbound form, Django won't display whatever of the validation errors that occurred.
To send the bound course to the template if a validation error occurs, you need to change your lawmaking slightly:
# dwitter/views.py # ... def dashboard ( request ): form = DweetForm ( request . Mail service or None ) if request . method == "POST" : if form . is_valid (): dweet = class . save ( commit = False ) dweet . user = request . user dweet . save () return redirect ( "dwitter:dashboard" ) return render ( request , "dwitter/dashboard.html" , { "form" : course }) With this change, you removed the duplicate instantiation of DweetForm and then that there'due south merely ever one form that'll go passed to your template, whether the user submitted a valid course or non.
The syntax that you used for this change might look unfamiliar. So here'southward what's going on:
-
Postal service request: If you call
dashboard()with a POST request that includes whatever data, therequest.Mail serviceQueryDictwill comprise your form submission data. Therequest.POSTobject now has a truthy value, and Python volition short-excursion theoroperator to return the value ofrequest.Postal service. This mode, you'll pass the form content as an statement when instantiatingDweetForm, as you did previously withform = DweetForm(request.Mail service). -
Become request: If you call
dashboard()with a GET asking,asking.POSTwill be empty, which is a falsy value. Python will continue evaluating theorexpression and return the 2nd value,None. Therefore, Django will instantiateDweetFormas an unbound form object, like you previously did withcourse = DweetForm().
The advantage of this setup is that you at present pass the bound grade to your template even when the form validation fails, which allows Django'south {{ form.as_p }} to return a descriptive error message for your users out of the box:
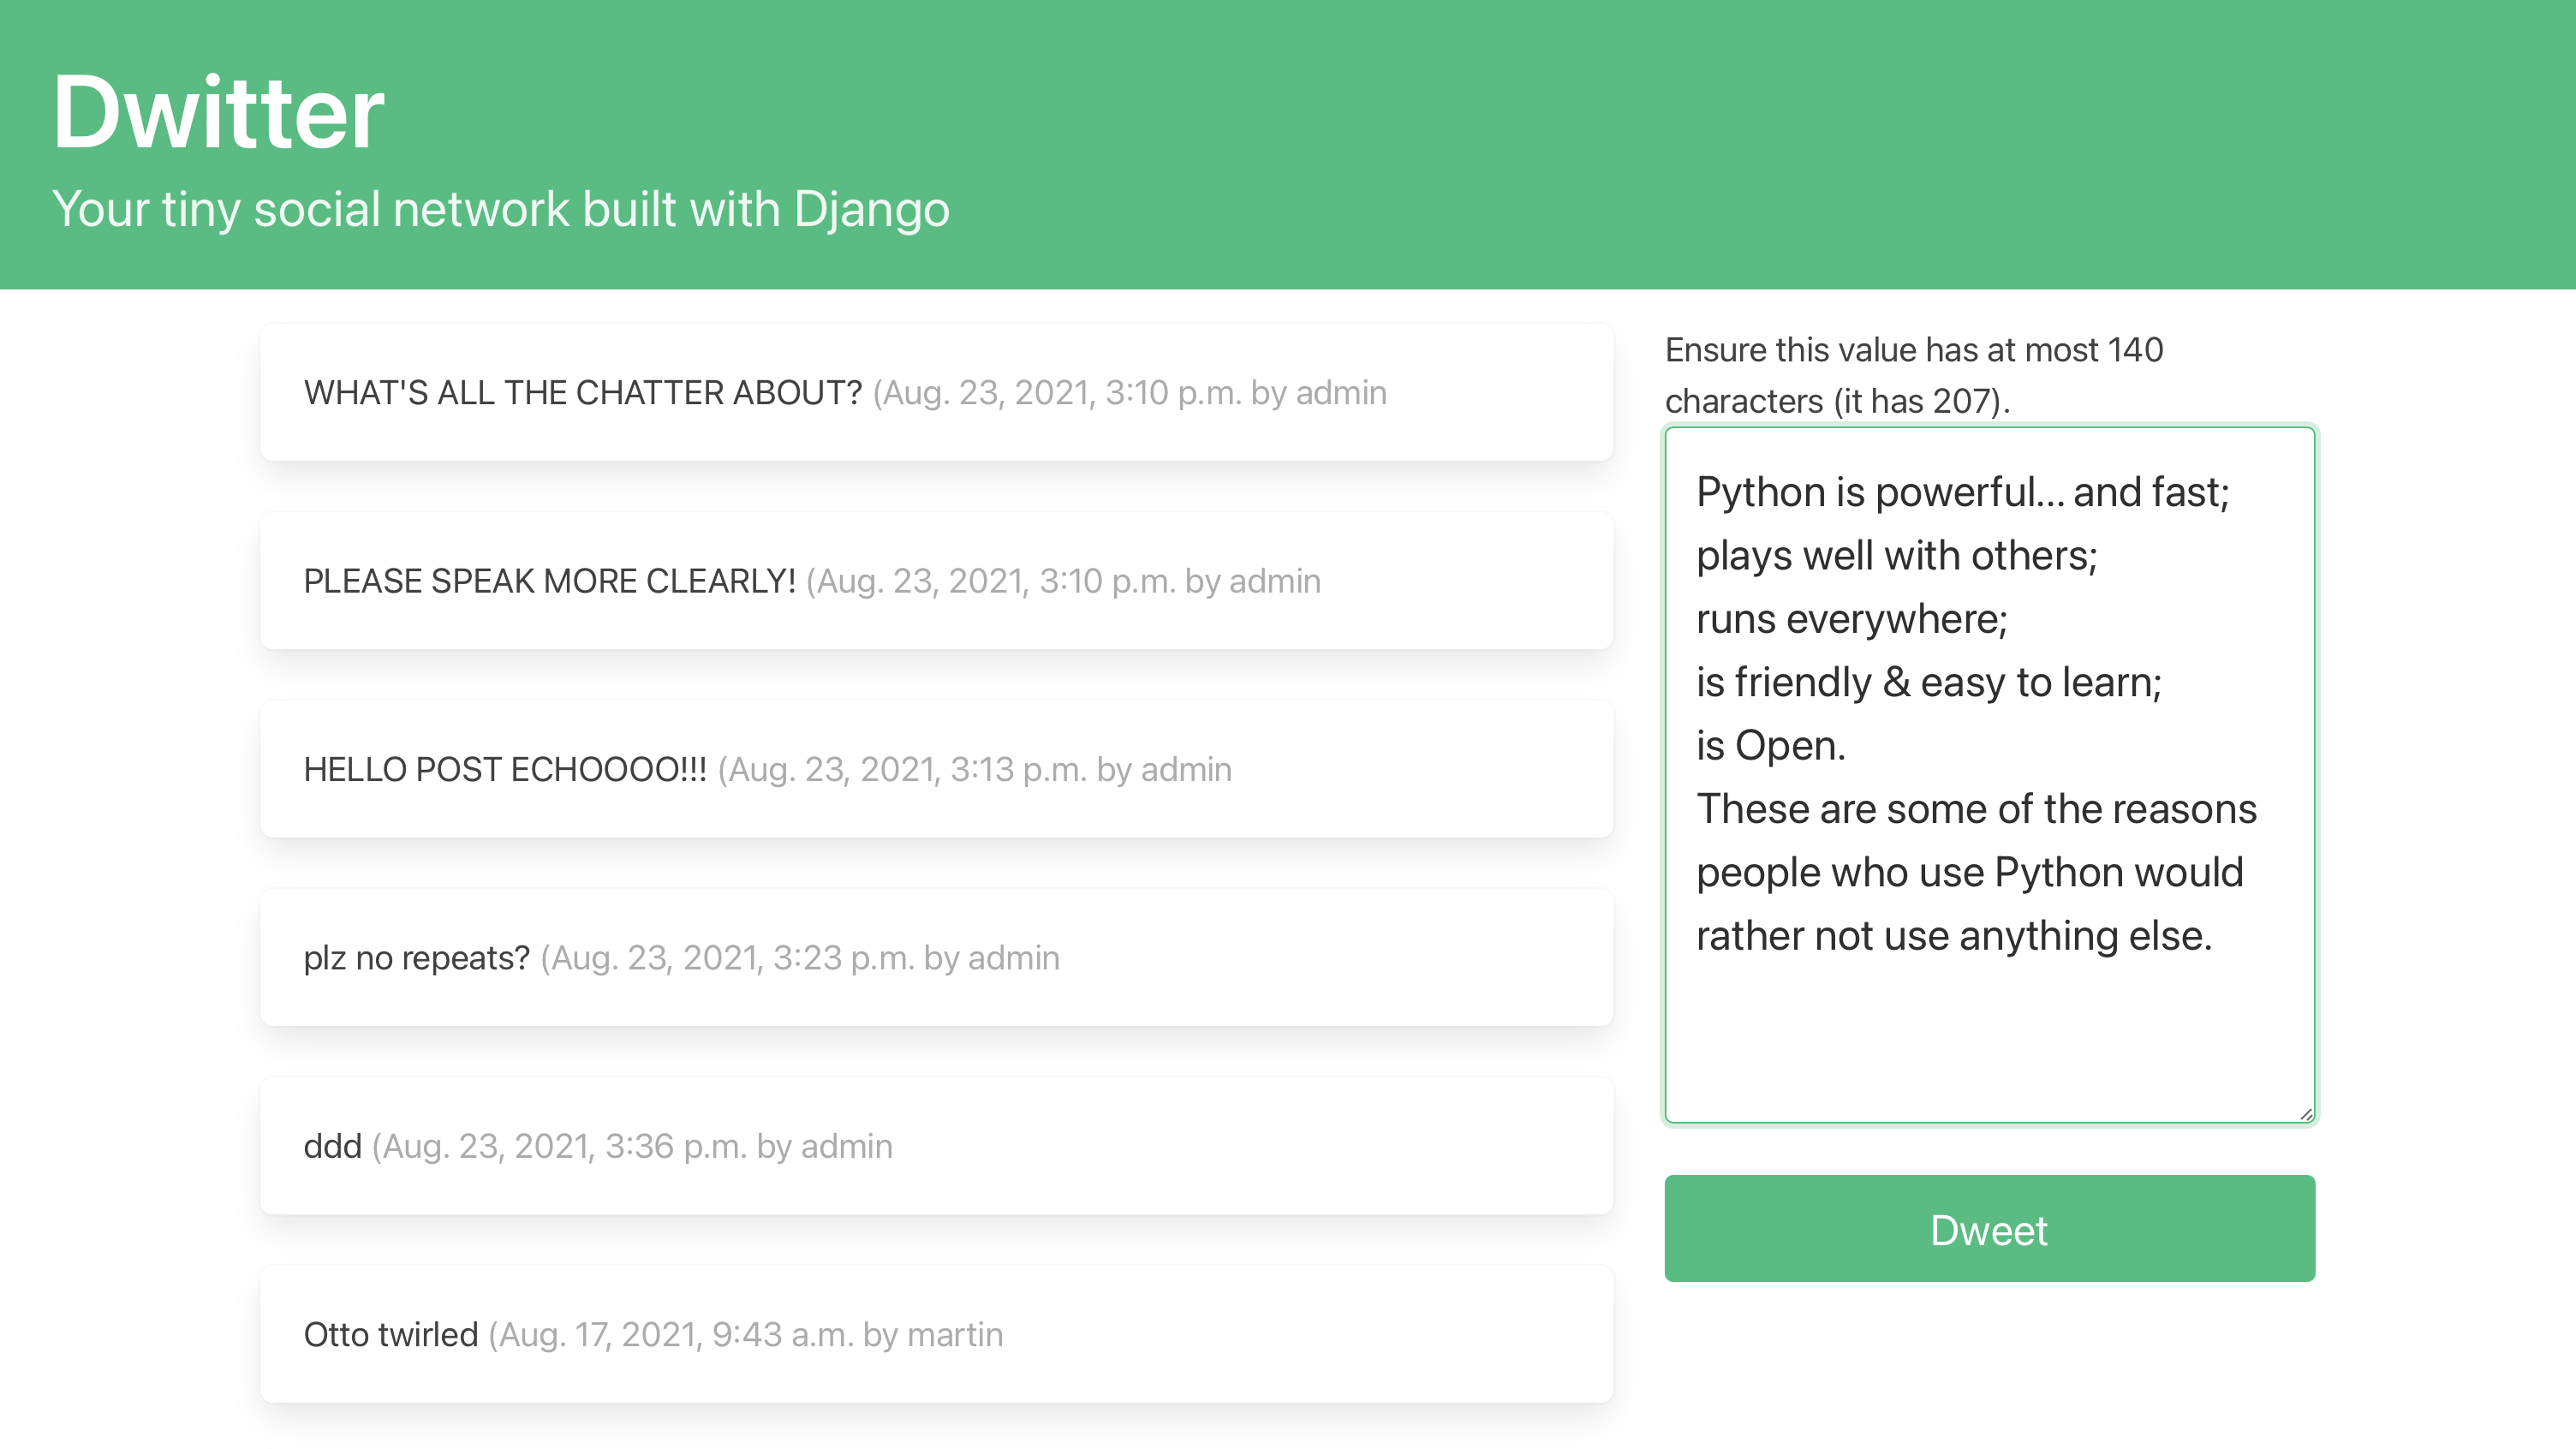
After submitting text that exceeds the character limit that yous defined in Dweet, your users volition come across a descriptive error bulletin pop upwardly right above the grade input field. This message gives them feedback that their dweet hasn't been submitted, provides data about why that happened, and even gives information about how many characters their current text has.
The best thing virtually this change is that y'all're passing the bound form object that retains the text data that your user entered in the course. No data is lost, and they tin can utilise the helpful suggestions to edit their dweet and submit it to the database successfully.
Step 12: Ameliorate the Front-Finish User Experience
At this point, you take a functional social media app that you built with the Django web framework. Your users can mail service text-based messages, follow and unfollow other user profiles, and see dweets on their dashboard view. At the finish of this step, y'all'll have improved your app's user experience by adding additional navigation links and sorting the dweets to display the newest dweets first.
Amend the Navigation
Your social network has 3 unlike pages that your users might want to visit at unlike times:
- The empty URL path (
/) points to the dashboard page. - The
/profile_listURL path points to the listing of profiles. - The
/profile/<int>URL path points to a specific user'southward profile page.
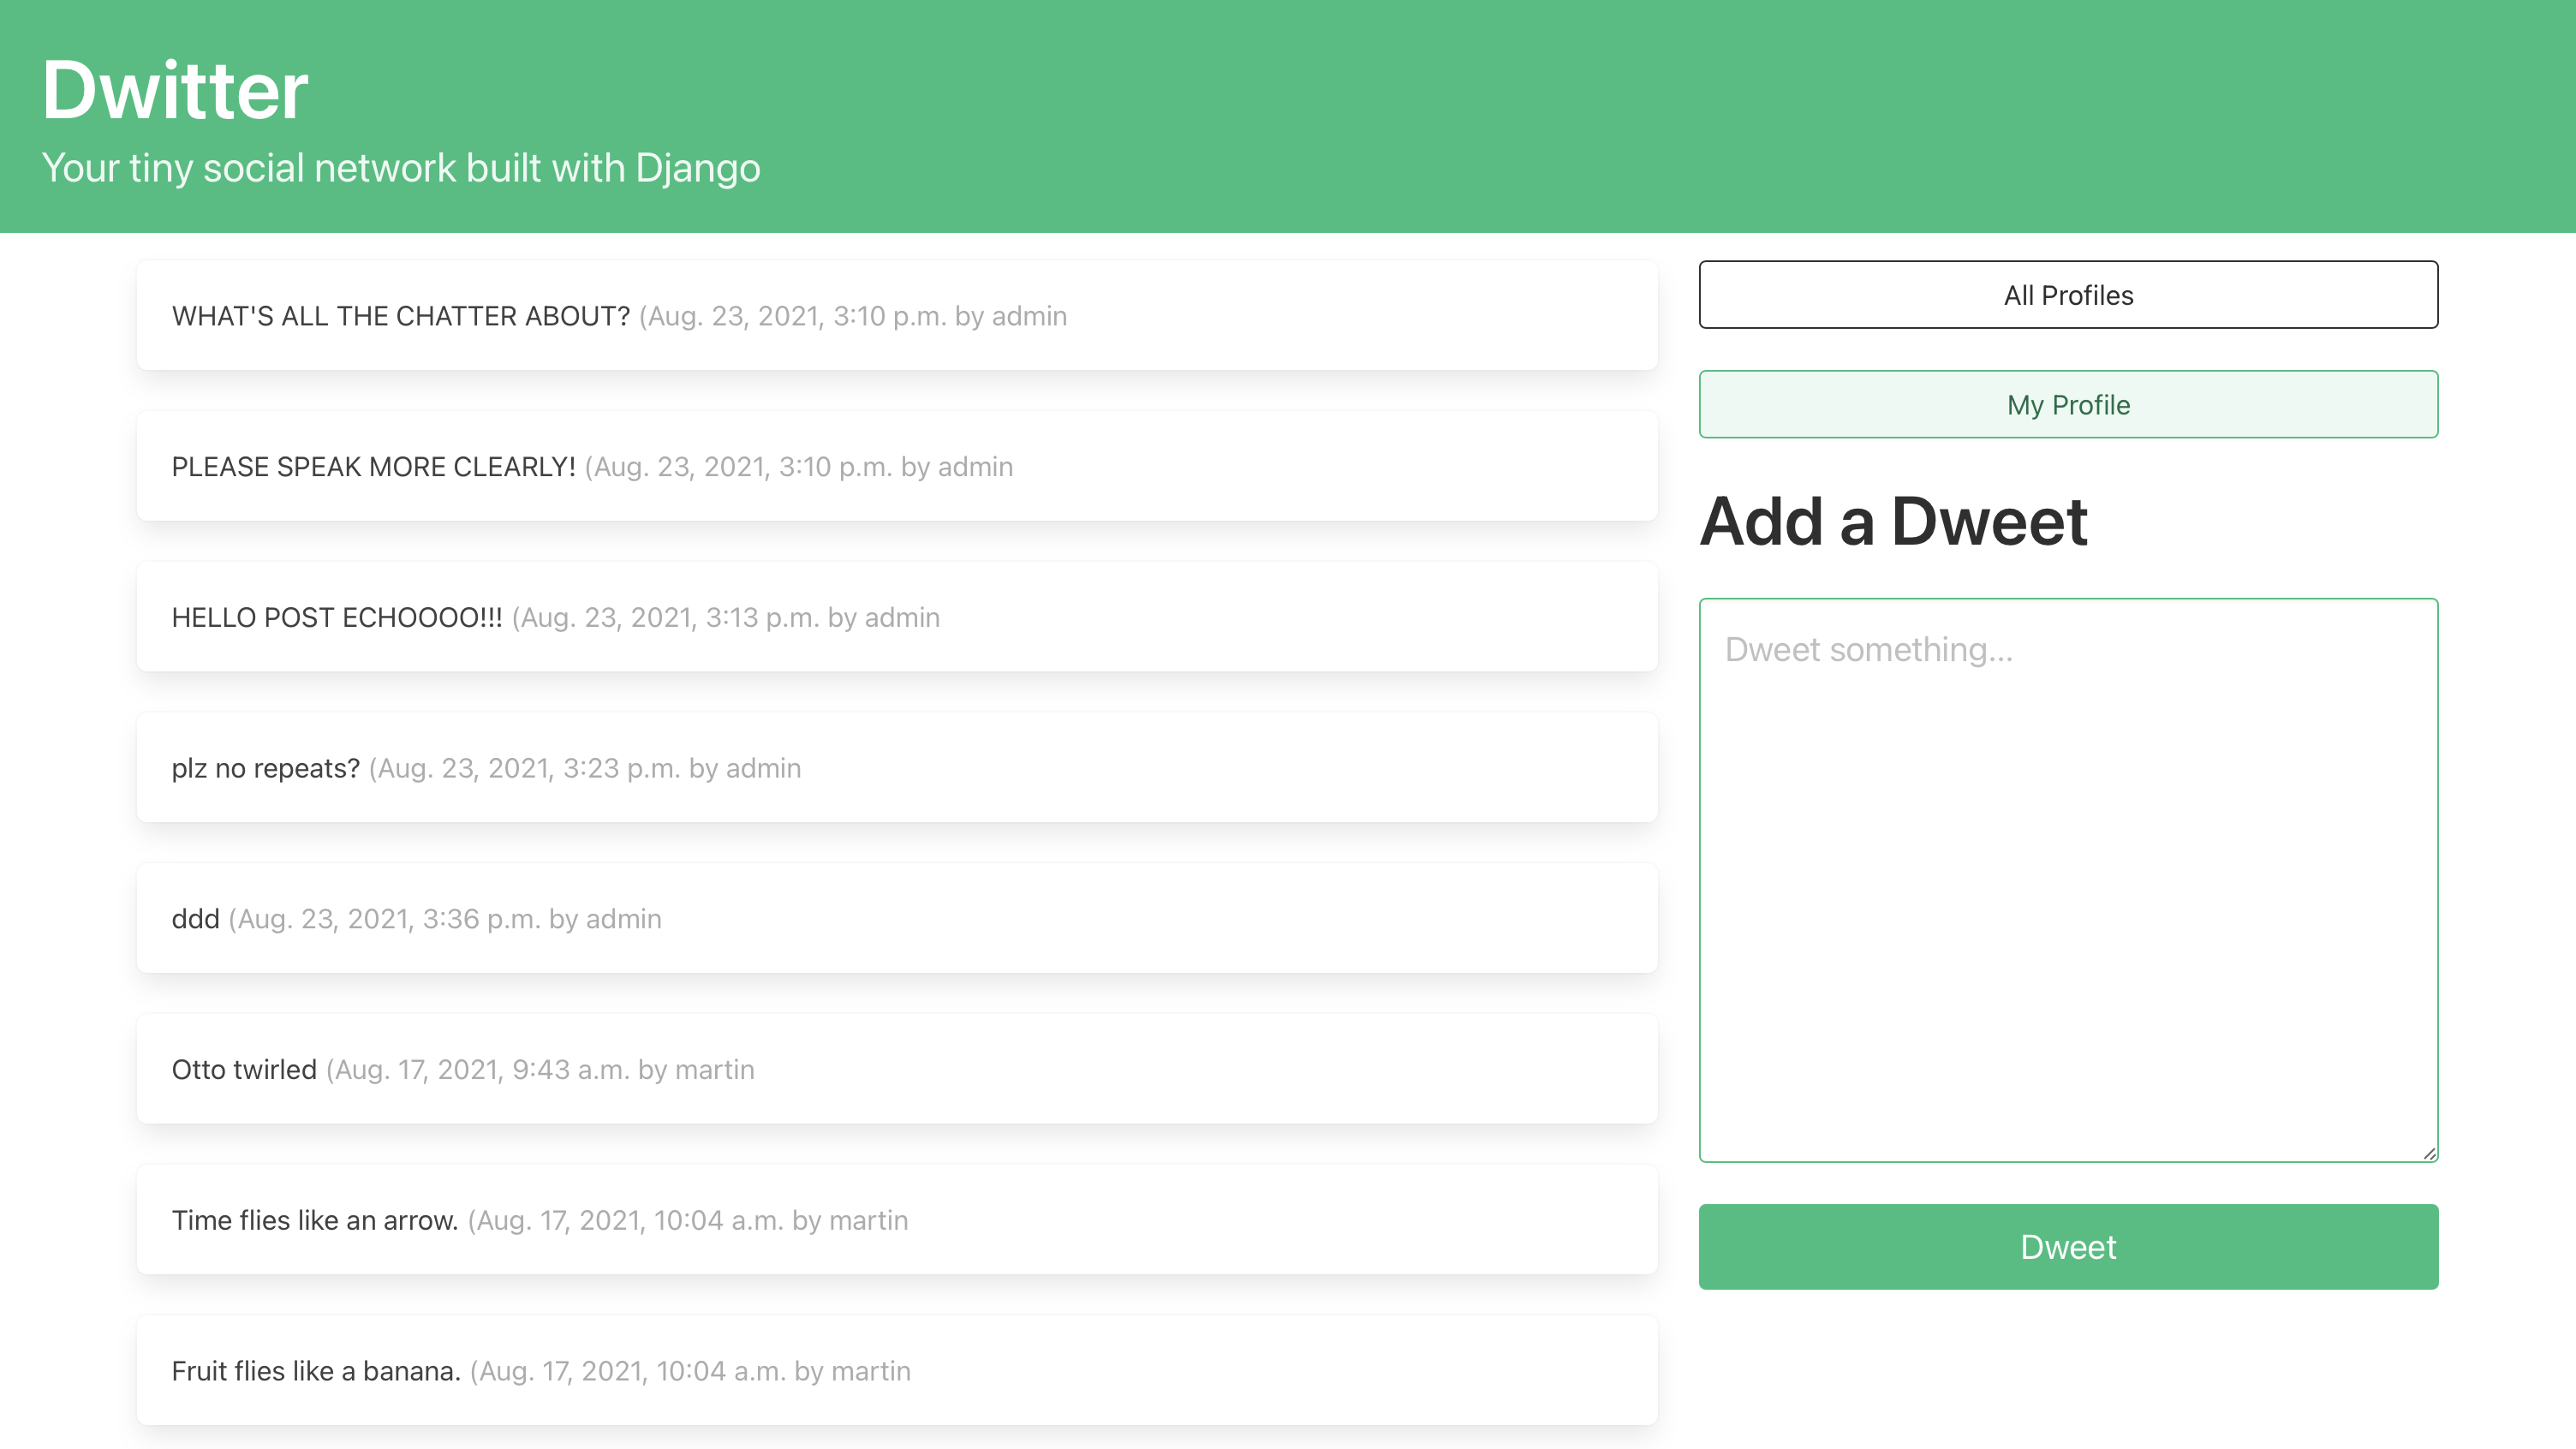
Your users can already access all of these pages through their corresponding URL slugs. However, while your users can, for case, access a profile folio past clicking on the username carte du jour from the list of all profiles, there's currently no straightforward navigation to access the profile list or the dashboard page. It'due south time to add together some more than links so that users tin can conveniently move between the different pages of your spider web app.
Caput back to your templates folder and open up dashboard.html. Add two buttons to a higher place the dweet form to allow your users to navigate to different pages in your app:
- The profile list page
- Their personal profile page
You tin can use the dynamic URL design with Django's {% url %} tags that yous've used before:
<!-- dwitter/templates/dwitter/dashboard.html --> <!-- ... --> < div form = "cake" > < a href = " {% url 'dwitter:profile_list' %} " > < button form = "push is-night is-outlined is-fullwidth" > All Profiles </ button > </ a > </ div > < div class = "block" > < a href = " {% url 'dwitter:profile' request.user.contour.id %} " > < button form = "button is-success is-light is-outlined is-fullwidth" > My Contour </ button > </ a > </ div > <!-- ... --> You lot can add this code as the first ii elements within <div class="cavalcade is-1-third">. You tin besides add together a heading but above your dweet form to explain more clearly what the class is for:
<!-- dwitter/templates/dwitter/dashboard.html --> <!-- ... --> < div class = "cake" > < div class = "block" > < h2 class = "championship is-two" >Add a Dweet</ p > </ div > < div class = "block" > < form method = "post" > {% csrf_token %} {{ form.as_p }} < button form = "button is-success is-fullwidth is-medium mt-v" type = "submit" >Dweet </ button > </ grade > </ div > </ div > <!-- ... --> With these two additions, you used the "block" class to arrange the three <div> elements on superlative of 1 another, and you added sensible navigation buttons that enhance the user experience on your dashboard page:
After adding all these changes, your dashboard template will be complete. You can compare the code that you lot wrote to the template beneath:
<!-- dwitter/templates/dwitter/dashboard.html --> {% extends 'base of operations.html' %} {% cake content %} < div form = "column" > {% for followed in user.profile.follows.all %} {% for dweet in followed.user.dweets.all %} < div class = "box" > {{ dweet.trunk }} < span class = "is-minor has-text-grey-light" > ({{ dweet.created_at }} by {{ dweet.user.username }} </ span > </ div > {% endfor %} {% endfor %} </ div > < div course = "cavalcade is-one-third" > < div class = "block" > < a href = " {% url 'dwitter:profile_list' %} " > < push button class = "button is-dark is-outlined is-fullwidth" > All Profiles </ button > </ a > </ div > < div class = "block" > < a href = " {% url 'dwitter:profile' request.user.contour.id %} " > < button class = "button is-success is-lite is-outlined is-fullwidth" > My Profile </ button > </ a > </ div > < div class = "block" > < div class = "cake" > < h2 grade = "championship is-ii" >Add a Dweet</ p > </ div > < div course = "block" > < course method = "post" > {% csrf_token %} {{ form.as_p }} < button class = "push is-success is-fullwidth is-medium mt-5" type = "submit" >Dweet </ button > </ class > </ div > </ div > </ div > {% endblock content %} Your dashboard page is functional and looks great! That'south important because it'll likely be the page where your users will spend well-nigh of their time when they interact with your social network. Therefore, you should also give your users ample possibilities to get back to the dashboard page after they've navigated, for example, to their profile page.
To make this possible, you can add a link to the dashboard page correct at the top of all of your pages past adding it to the app header that you wrote in base.html:
<!-- templates/base.html --> <!-- ... --> < a href = " {% url 'dwitter:dashboard' %} " > < department form = "hero is-small is-success mb-four" > < div class = "hero-body" > < h1 class = "title is-i" >Dwitter</ h1 > < p class = "subtitle is-4" > Your tiny social network built with Django </ p > </ div > </ section > </ a > <!-- ... --> By wrapping the HTML <department> element in a link element, you made the whole hero clickable and gave your users a quick way to return to their dashboard page from anywhere in the app.
With these updated links, you've improved the user feel of your app significantly. Finally, if your users want to stay upwardly to date with what their network is dweeting, y'all'll want to change the dweet brandish to show the newest dweets first, contained of who wrote the text.
Sort the Dweets
There are a couple of ways that you could sort the dweets, and a few places where you could do that, namely:
- In your model
- In your view role
- In your template
Upwardly to at present, you've built quite a bit of your code logic inside of your dashboard template. Only there's a reason for the separation of concerns. As you'll learn beneath, you should handle nearly of your app's code logic in the views.
If you wanted to sort the dweets to brandish the newest dweet outset, independent of who wrote the dweet, yous might scratch your head most how to do this with the nested for loop syntax that you're currently using in your dashboard template.
Do y'all know why this might get hard? Caput over to dashboard.html and audit the current setup:
{% for followed in user.profile.follows.all %} {% for dweet in followed.user.dweets.all %} < div course = "box" > {{ dweet.trunk }} < span course = "is-small has-text-grey-low-cal" > ({{ dweet.created_at }} by {{ dweet.user.username }}) </ span > </ div > {% endfor %} {% endfor %} How would y'all attempt to approach the sorting with this setup? Where practise you think you might run into difficulties, and why? Take a moment and pull out your pencil and your notebook. Liberally brand employ of your preferred search engine and see if you can come upwardly with a solution or explicate why this might be challenging to solve.
Instead of handling so much of your code logic in your template, it'due south a better idea to do this right inside dashboard() and pass the ordered consequence to your template for brandish.
So far, you've used view functions that handle just the form submission and otherwise ascertain which template to render. You didn't write any boosted logic to determine which data to fetch from the database.
In your view functions, you can use Django ORM calls with modifiers to go precisely the dweets you're looking for.
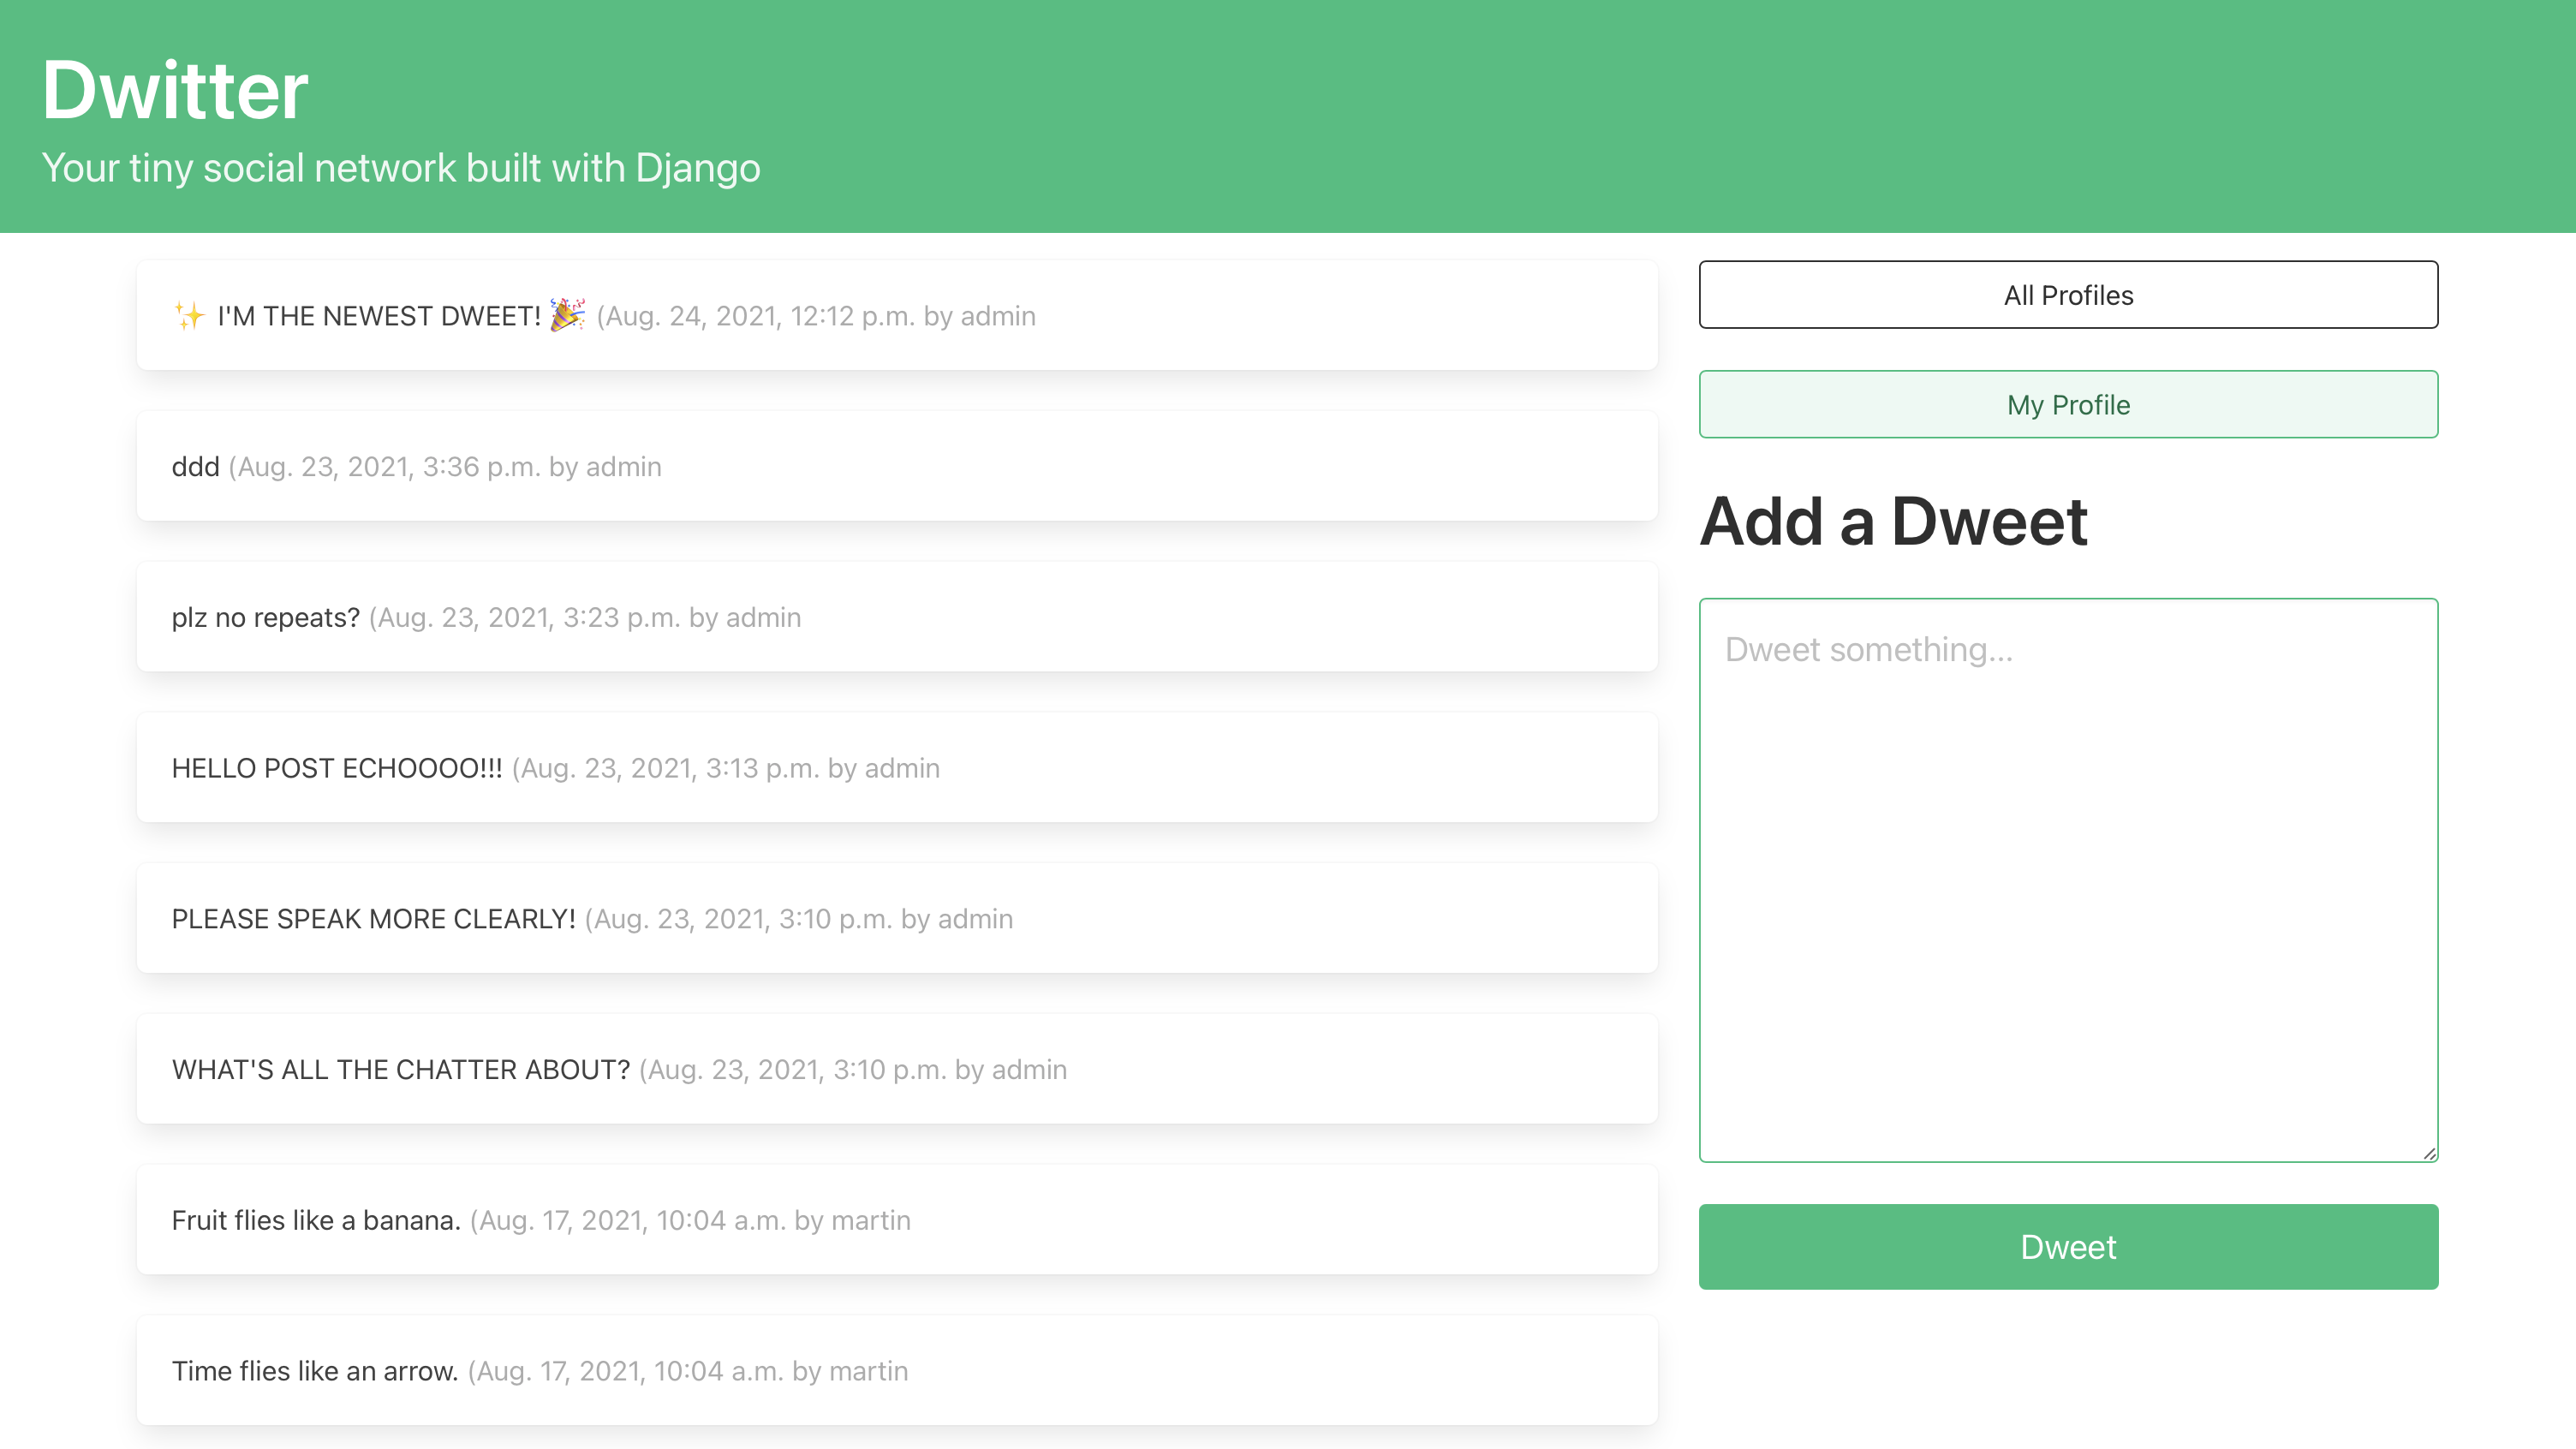
You lot'll fetch all the dweets from all the profiles that a user follows correct within your view function. Then you'll sort them past date and time and pass a new sorted iterable named dweet to your template. You'll use this iterable to brandish all these dweets in a timeline ordered from newest to oldest:
i # dwitter/views.py ii 3 from django.shortcuts import render , redirect 4 from .forms import DweetForm 5 from .models import Dweet , Contour vi 7 def dashboard ( request ): 8 course = DweetForm ( request . Post or None ) ix if request . method == "POST" : 10 if form . is_valid (): 11 dweet = form . salvage ( commit = False ) 12 dweet . user = request . user thirteen dweet . save () xiv return redirect ( "dwitter:dashboard" ) 15 16 followed_dweets = Dweet . objects . filter ( 17 user__profile__in = asking . user . contour . follows . all () 18 ) . order_by ( "-created_at" ) 19 twenty return render ( 21 request , 22 "dwitter/dashboard.html" , 23 { "grade" : course , "dweets" : followed_dweets }, 24 ) In this update to dashboard(), you make a couple of changes that deserve farther attention:
-
Line 5: You add an import for the
Dweetmodel. Until at present, you didn't need to address any dweet objects in your views because you were handling them in your template. Since yous want to filter them now, you need access to your model. -
Line 16: In this line, you use
.filter()onDweet.objects, which allows you to pick particular dweet objects from the table depending on field lookups. You save the output of this call tofollowed_dweets. -
Line 17 (keyword): First, you define the queryset field lookup, which is Django ORM syntax for the main part of an SQL
WHEREclause. You can follow through database relations with a double-underscore syntax (__) specific to Django ORM. You writeuser__profile__into admission the profile of a user and see whether that profile is in a drove that you'll pass as the value to your field lookup keyword argument. -
Line 17 (value): In the 2d part of this line, you provide the second office of the field lookup. This function needs to be a
QuerySetobject containing profile objects. You can fetch the relevant profiles from your database by accessing all profile objects in.followsof the currently logged-in user'southward profile (request.user.profile). -
Line xviii: In this line, you chain another method call to the event of your database query and declare that Django should sort the dweets in descending order of
created_at. -
Line 23: Finally, you add a new entry to your context dictionary, where you pass
followed_dweets. Thefollowed_dweetsvariable contains aQuerySetobject of all the dweets of all the profiles the current user follows, ordered by the newest dweet offset. You're passing it to your template nether the key namedweets.
You lot can now update the template in dashboard.html to reverberate these changes and reduce the amount of code logic that yous need to write in your template, effectively getting rid of your nested for loop:
<!-- dwitter/templates/dwitter/dashboard.html --> <!-- ... --> {% for dweet in dweets %} < div class = "box" > {{ dweet.body }} < span course = "is-pocket-sized has-text-grey-light" > ({{ dweet.created_at }} by {{ dweet.user.username }} </ span > </ div > {% endfor %} <!-- ... --> You've fabricated the pre-selected and pre-sorted dweets bachelor to your template nether the name dweets. Now you tin can iterate over that QuerySet object with a single for loop and access the dweet attributes without needing to footstep through any model relationships in your template.
Go alee and reload the page after making this change. You tin can now encounter all the dweets of all the users you follow, sorted with the newest dweets up acme. If you lot add a new dweet while following your own business relationship, it'll appear right at the top of this list:
This alter completes the last updates you lot demand to make so that your Django social media app provides a convenient experience. You tin can now declare your Django social media app feature-complete and start inviting users.
Conclusion
In this tutorial, you built a small social network using Django. Your app users tin follow and unfollow other user profiles, postal service short text-based messages, and view the messages of other profiles they follow.
In the process of building this project, you've learned how to:
- Build a Django project from first to finish
- Implement
OneToOneandForeignKeyrelationships between Django models - Extend the Django user model with a custom
Profilemodel - Customize the Django admin interface
- Integrate Bulma CSS to mode your app
You've covered a lot of ground in this tutorial and built an app that you can share with your friends and family unit. You lot tin can also brandish it every bit a portfolio project for potential employers.
You can download the terminal code for this project by clicking the link beneath and going to the source_code_final/ binder:
Next Steps
If you've already created a portfolio site, add together your project there to showcase your work. You lot tin go on improving your Django social network to add functionality and make it even more impressive.
Hither are some ideas to take your project to the next level:
- Implement User Authentication: Allow new users to sign up through the front of your web app by post-obit the steps outlined in Get Started With Django Role 2: Django User Management.
- Deploy Your Dwitter Project: Put your spider web app online for the whole globe to see by hosting your Django project on Heroku.
- Go Social: Invite your friends to join your Django social network, and starting time dweeting your thoughts to ane another.
What other ideas can you come with to extend this projection? Share your project links and ideas for further development in the comments below!
Source: https://realpython.com/django-social-forms-4/
0 Response to "Create a Form for Uploading a Tuple Django"
Post a Comment